the link provided will take you to a manual fo the gy6 engine this manual includes details on how to break apart the engine piece by piece as well as guidelines for most routine maintenance procedures such as tune ups oil change brake change shock change they are included in this manual
http://k.b5z.net/i/u/6023538/f/4-Stroke_Engine_Manual_rev2.pdf

Many people own a scooter nowadays for the great fuel economy that they all possess, but many have found that if you have a foreign make or model that finding someone in your town to repair a broken scooter may be a failed effort. I dedicate this blog to helping those with a scooter in need of repair advice. Most makes are similar to the above photo.
Sunday, July 31, 2011
the starter torn apart
I decided to unbolt it and see whats going on inside. I took a few pics just in case anyone wanted to see for themselves.
![[image]](http://img530.imageshack.us/img530/1381/dsc00010xd1.jpg "[image]")
![[image]](http://img444.imageshack.us/img444/8145/dsc00011qe2.jpg "[image]")
![[image]](http://img530.imageshack.us/img530/7213/dsc00012ir8.jpg "[image]")
Once I cleaned all the crap out it looked a bit better inside.
![[image]](http://img530.imageshack.us/img530/2051/dsc00014rq7.jpg "[image]")
I gave the contacts a rubdown afterwards to improve contact.
![[image]](http://img530.imageshack.us/img530/6650/dsc00015ki3.jpg "[image]")
Well there it is back together. Once I greased it up and mounted it back on my bike the nasty noise had gone.
![[image]](http://img206.imageshack.us/img206/4661/dsc00016yc3.jpg "[image]")
Once I cleaned all the crap out it looked a bit better inside.
I gave the contacts a rubdown afterwards to improve contact.
Well there it is back together. Once I greased it up and mounted it back on my bike the nasty noise had gone.
backfiring on acceleration possible cause
The last few days, my KMD 150 GY6 would start dying at intersections and give an every-now-and-then backfire.
I replaced the fuel and vacuum lines and fuel filter thinking there might be a vacuum leak because the hoses on the intake were almost ready to fall off!!
That didn't fix it.
Yesterday on the way home from work, it ALMOST left me stranded with the horrendous popping and backfiring.....would hardly climb hills......under load and acceleration as well as stalling at lights.
What made me think it was fuel was it would idle and rev great and part throttle was okay but once you put it under load....WOW! Fuel problem, right? EEEE! Wrong. Read on.....
So first thing this morning I tore into it thinking for sure I had ingested crud into the carburetor (blocked fuel circuit) or a tore diaphram (no part throttle enrichment) or.......
Nope.
No crud, diaphram is perfect and carburetor is spotless inside.
I beat my head against the wall for a good 4 hours this morning chasing what I thought was a fuel problem.
The problem was the two small coil wires!!
If you have these symptoms, by all means....check the two small wires at the coil!
One of mine was so loose it basically fell off in my hand!
I have NO idea how it made it over 600 miles!
It's been shorting/arcing since new, I bet.
There was black stain inside the connector boot and on the terminal from arcing/shorting.
The other terminal was a POOR fit.
I squeezed down on them with pliers to tighten their "grab", cleaned the terminals and connectors and they fit 100% better.
No kidding.....my scoot has NEVER run this good!!!.
I only hope I can save someone else the 4 hours of tinkering I went through diagnosing the problem......I beat my head against the wall chasing what I thought was a fuel problem for it to turn out to be ignition related.
Now she's running TIP TOP.
Keep scootin'!
Friday, July 29, 2011
When you lose an eclip
| |||||||||||
| |||||||||||
| |||||||||||
| |||||||||||
| | |||||||||||
| |||||||||||
| |||||||||||
| |||||||||||
| |||||||||||
| |||||||||||
| |||||||||||
| |||||||||||
| |||||||||||
| |||||||||||
| |||||||||||
 Logged
 I love it when I help fix a scooter thousands of miles away.
Reason to change from the stock filter on a scooter
Hi gang. Just a tip for you dawgs out there. These photos show you why it is so important to change out the stock fuel filter that comes on your new scooter. They are of dubious quality and may even be included in a recent recall of chinese fuel filters. I recently changed mine as it was leaking at the glued seam. I was more concerned with the crappy design of it. I opened it after noticing that the paper filter inside looked strange. What I found was that the paper element was not sealed all the way around. That is as good as no filter. Th fuel line was thin and very stiff like plastic. I replaced it with some quality rubber fuel line. I suggest you change yours too.
![[image]](http://i27.tinypic.com/23movn.jpg "[image]")
![[image]](http://i28.tinypic.com/2d2gp49.jpg "[image]")
![[image]](http://i26.tinypic.com/xdt56u.jpg "[image]")
![[image]](http://i28.tinypic.com/2u6fexi.jpg "[image]")
![[image]](http://i31.tinypic.com/3452e77.jpg "[image]")
Engine Backfire on deacceleration
One of the most asked questions pertaing to the Honda Elite CH
150/250 and CN 250 Helix involves a backfire through the
exhaust on sudden deceleration.
An engine is not supposed to backfire and, when it is persistent,
It could be harmful to the engine. If there is an explosion in the
exhaust pipe when the cylinder is trying to exhaust its spent
combustion products, a back pressure is created which
interferes with the next cycle. This could result in incomplete
extraction, irregular charging with the fresh mixture, and
overheating. In addition, valves are not designed to seal against
pressure from their backsides and a broken valve rattling around
in the combustion chamber is a real possibility. While the
explosion sound ranges from a baby fart to a gunshot, its
annoying to say the least. In almost all the situations studied
various causes and remedies have been found with none
answering the question entirely.
In general, backfiring on deceleration (as opposed to
acceleration) is generally caused by a lean condition in the pilot
circuit. What happens is that the mixture leans out enough to
where is fails to ignite consistently. This, in turn allows some
unburned fuel to get into the exhaust pipes. Then when the
engine does fire, these unburned gasses are ignited in the
exhaust pipe, causing the backfire. Then, the classic diagnosis
is too lean a fuel mixture. The real mystery is where that lean
condition is coming from.
Here are the suspects:
1. Low Idle. Some folks cure backfiring by turning up the idle
slightly. This is the screw with the spring on it in the right front of
the CV carburetor. Recommended rpm is between 1100-1500.
Many scooters never run at the low end of the recommended idle
rpm range anyway. Turn up the idle first.
2. Exhaust Gasket. This seems to be one of the most frequent
causes of backfiring problems and an item that has been seen
to fail quite often. Air is sucked back into the combustion
chamber causing a lean condition at ignition and the backfire.
The exhaust gasket is a small metal rimmed fiber edged part
that people seem to forget to inspect when servicing the exhaust
or leave it out altogether.
3. Leaking Carburetor Intake Boot. The CV carburetor is fastened
to the intake with a stiff rubber intake boot. Sometimes it is not
sealed properly or gets a small crack in it enough to allow
excess air into the intake. The extra air from the split boot will
cause the popping. To check your intake rubber, you can spray
WD-40 in the suspected area while the engine is running. Any
decrease in engine revs confirms a leak. Another method is to
use an unlit propane torch, just barely cracked open, and see if
the idle changes when the gas gets sucked in. Don't get carried
away or you will flame the scoot! Less messy than using WD-40.
4. Leaking Vacuum Hose. Any misconnected or leaking carb
vacuum hoses can also encourage backfiring. That means the
carb fuel mixture is also slightly leaner, more prone to backfiring.
Check for cracked or stiff bending hoses and replace if
necessary. Putting the hoses back correctly may help with the
backfiring without having to adjust the idle screw or pilot screw.
The misconnected hoses can also degrade low end response
slightly.
5. Pilot Screw. On the back of the Keihin Constant Velocity (CV)
carburetor is the pilot adjustment screw also known as the
enrichment circuit adjuster. On the CH 150, it is covered with a
plug which has to be removed. On the 250 cc motors, this screw
should have a limiter cap on it to vary the adjustment. For a rich
carburetor adjustment, turn the adjustment screw clockwise (in
toward the carb body) a tad to eliminate a lean running condition.
All adjustments should be made with a warm engine. See Tech
Tip #7 Pilot Screw Adjustment & Fix for a more detailed service).
6. Air Cut-off Valve. This component is the prime suspect. On the
back of the CV carb is the air cut-off valve. The air cut off valve
enrichens the pilot circuit on deceleration by means of a
rubberized piston. One hose to the valve (nearest air filter) is the
air tube connector and the other (nearest the autobystarter) is the
vacuum connector port. If air pushed through the cut-off valve by
a pressure pump leaks by the vacuum port connector while
vacuum is initiated with a vacuum pump, replace the air valve. I
replaced a faulty air cut off piston and my backfiring ceased. The
air cut-off valve is expensive (about $70) and should be replaced
after all other suspects tested have failed.
7. Enrichening The CV Jetting. I solved a similar deceleration
backfire on a CH250 by removing the 112 (lean) main jet and
using a 115 or 118. The CN250, which uses a leaner 110 main
jet, could also benefit from the main jet enrichment.
credit to jwp767 and randy pozzi
the info is a valid solution for many makes and models.
Changing a camshaft on a scooter motor
Camshaft Install Instructions
A. Before installation
1) Wash the entire buggy. This will keep dirt from falling where you don�t want it while the engine is exposed.
2) Remove the passenger seat from vehicle.
3) Make sure the engine is cold.
1) Wash the entire buggy. This will keep dirt from falling where you don�t want it while the engine is exposed.
2) Remove the passenger seat from vehicle.
3) Make sure the engine is cold.
B. Access Camshaft assembly
1) Loosen the intake tube at the carburetor and remove the airbox and tube assembly.
2) Remove black plastic fan shroud from passenger side of motor. (Seven 8mm screws/bolts)
3) Remove carburetor and air intake boot from motor as a unit and place on a clean surface. Force may need to be applied to remove intake boot from engine if it binds. (Two 10mm nuts)
Note: Fuel line will need to be clamped to avoid dumping fuel.
Note: Insert a small clean rag into the intake hole to keep dirt from falling into the engine.
4) Remove plastic shroud from top of motor to gain access to cam chain tensioner. The lower shroud does not need to be removed.
Finding Top Dead Center
What is TDC? Top Dead Center refers to the piston being at the very top of its travel in the cylinder. On a four stroke, TDC will occur at the top of the compression stroke and the top of the exhaust stroke.
5) Remove sparkplug.
6) Move Flywheel until (T) mark is aligned with the arrow mark on the engine case.
7) Loosen four valve cover bolts and remove the valve cover.
8) Now that you are inside the valve cover, rotate the flywheel until the cam is at the TDC position with hash marks aligned straight across the valve cover surface and the large TDC hole at the top of the cam gear. (Large TDC hole should be pointing directly towards seats)
Note: Document TDC on the flywheel using permanent ink; reference your mark to a point on the engine case.
C. Remove Camshaft
1) Remove the cam chain tensioner by removing the 2 bolts that secure it to the cylinder. Unless you have a spare, you will need to reuse the gasket. Use a razor blade to properly separate the gasket from the tensioner.
2) Remove the 4 head bolt nuts from the rocker tower and remove it.
3) Remove cam chain by tipping the cam gear downwards.
Caution: Be sure not to drop the cam chain down into the case. The case may need to be split to refit it.
4) Secure the cam chain with a cord or rope tied to a part of the chassis so it can be accessed on reassembly.
D. Reassembly
1. Insert the new cam by again tipping the cam gear down and attaching the cam chain making sure the alignment is set to the mark you made on the flywheel and the hash marks on the cam, with the large cam hole pointing at the seats.
2. Install the cam tower back onto the cylinder studs with the EX towards the exhaust valve (downward).
3. Install the head stud nuts and torque to 1st 16 lbs then on to 25 lbs using a cross pattern.
Note: The Yerf Dog manual states 16lbs on these nuts, however they come from the factory tourqed to 25lbs.
4. Recheck the cam alignment chain to ensure the cam is in the correct position to the mark you made on the flywheel.
Cam Chain Tensioner.
5. Release the spring tension on the cam chain adjuster by removing the screw cap and turning the adjuster inside using a small flat blade screwdriver clockwise until it stops. This will remove all tension from the adjuster.
6. Insert the adjuster and tighten the 2 mount screws while holding the 0 tension on the adjuster.(Make sure gasket is in place.)
7. Turn the adjuster back to full tension (rotate counter-clockwise, will rotate on its own) and reinstall the cap screw.
Caution: Failure to release the tension on the Cam Chain Adjuster during reassembly will damage the cam chain beyond use. (The cases must be split to replace the cam chain.)
Adjusting the Valves.
1. Adjust the valve tappets using a feeler gauge to a clearance of :
Intake- .002- .004 � Exhaust .003-.006�
Note: Printer paper happens to be 0.003� :)
Note: Valves must be adjusted on a COLD engine.
Note: Adjust valves with engine at at TDC.
2.Loosen the 9mm valve tappet lock nut and turn the tappet out several turns
3.Sandwich your feeler gauge between the bottom of the tappet (adjuster screw) and the top of the valve
Note: Feeler gauges are thin pieces of metal which are a predetermined thickness.
4.Tighten the tappet while moving the feeler gauge back and forth until you can feel a slight drag on the feeler.
5.Tighten the lock nut with the feeler in place.
6.Ensure the gap is still within proper range by sliding the feeler back and forth again.
7.Repeat step 2 - 6 for remaining valve.
E. Final Assembly and Inspection.
1. Rotate the assy several times by turning the flywheel then recheck the TDC-Mark to Cam alignment.
2. Reinstall all remaining assemblies in the reverse direction of disassembly.
3. Check operation of motor. ( Does it start and idle?)
4. Check jetting and set as required by intake, exhaust and cam use.
Proper selection of carb jets
Sizing at sea level:
With UNI filter 120-125
With UNI filter and low restriction exhaust 130-135
With UNI filter, low restriction exhaust, A12 cam, performance coil & CDI and NGK Iridium spark plug 135-140
Test procedure:
1. Run engine at less than half throttle a minimum of 15 minutes to close electric choke
2. On a 300' or 100 meter stretch or greater, run the engine at wide open throttle
3. While still holding the gas pedal to the floor, cut the ignition
4. Remove the spark plug and inspect end for color
a. White - Increase jet size
b. Tan/Brown - Correct jet size
c. Black - Decrease jet size
5. Clean spark plug with brass wire brush and check the gap prior to next test run
Hints:
1. Change jet size by 2 or 2.5 for fine adjustment by 5 for coarse adjustment
2. Reduce jet size by 2 or 2.5 for every 1500 ft or 500 meters of elevation
3. Stock fuel delivery may not be sufficient above a 130 main jet and may require larger diameter fuel lines and less restrictive fuel filter
4. Once main jet is selected, the air/fuel mixture screw can be adjusted for optimum idle
credit to buggydepot.com
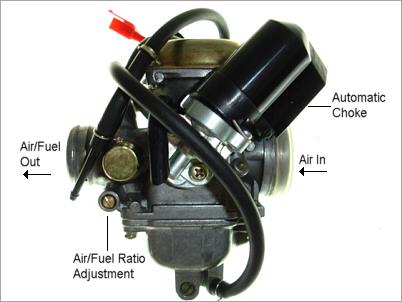
Explanation of how choke works on scoots and testing them
We frequently receive questions about how the auto-choke and its operating needle work. As it turns out, the auto-choke isn't a choke at all. That is, it doesn't choke airflow through the carburetor like you would find on a lawnmower or generator type of engine. Instead, it sends extra fuel through the carburetor. This is called an enrichment circuit.
This circuit is controlled by the charging system. When your engine is off, the choke (enrichment circuit) is actually "on" in it's default resting state. When the engine is turned on and voltage is applied to the choke, the needle extends and eventually plugs the enrichment ports within the carburetor. This happens within a couple of minutes as the engine warms up.
What we usually see with a bad auto-choke is that the engine will start up and run great cold, but as the engine warms up there will be problems driving, starting, and/or idling.
To test your auto-choke:
1. Remove choke assembly from the choke holder on the side of the carb. The needle should be clearly visable.
2. Measure the overall length of the choke from end-to-end, including the very tip of the needle.
3. Now connect the choke's electrical leads to a 12v power source. Black is negative.
4. Wait 5-10 minutes and re-measure. The needle should have extended.
5. The overall length should be approximately 3mm more than before.
credit to buggydepot.com
loss of power common problems and solutions
Bogging down is usually caused by one (or more) of three things. Running rich, running lean, or a weak spark.
I'll start off with a very brief explanation of what Air/Fuel mixture is. The job of a carburettor is to atomize liquid fuel by injecting it into a flowing stream of air. The mixture of this air and fuel must be rather precise in order to combust within the cylinder. If there is much air, or too much fuel being delivered you will experience power loss and/or bogging down. With that said.. lets get down to the troubleshooting:
Most common cause: Running rich
Running rich (too much fuel in the air/fuel mix) could be caused by several things. The most common cause is a failing automatic choke unit. The choke on the GX150 carburettor is actually an enrichening circuit and in reality does not choke off any airflow at all. The auto-choke is ON in it's natural state. A failing auto-choke remains in the ON position at all times, thus it is characterized by the buggy running fine when cold, and hardly running at all when warm.
Running Lean
You may be running lean (too much air in the A/F mixture) if you are: 1. Having a hard time getting the engine started, 2. Once started the throttle is very tricky, too much throttle and the engine dies, and/or 3. Engine bogs and will not go beyond a certain RPM. This is commonly caused by a deteriorated intake inlet manifold. This inlet manifold can be found connecting the carburettor to the intake side of the engine. This little elbow-shaped inlet can form dry-rotting cracks, thus becoming a major vacuum leak. Please note: when replacing the intake inlet manifold, do NOT over tighten the nuts when securing it to the cylinder head.
Weak Spark
If the Air/Fuel mixture getting to your engine seems fine, then you may be looking at a weak spark. Ignition troubleshooting will be covered in detail on another page. The basic rundown is this: Stator/trigger wire -> CDI -> Ignition Coil -> Spark plug. It is best to check the resistance of the parts in question. Check the Yerf Dog GX150 Service Manual to find out the correct resistance values.
credit to buggydepot.com for info
Wednesday, July 27, 2011
how to read ngk plugs
Q: How do I "read" a spark plug?
A: Being able to "read" a spark plug can be a valuable tuning aid. By examining the insulator firing nose color, an experienced engine tuner can determine a great deal about the engine's overall operating condition.In general, a light tan/gray color tells you that the spark plug is operating at optimum temperature and that the engine is in good condition. Dark coloring, such as heavy black wet or dry deposits can indicate an overly-rich condition, too cold a heat range spark plug, a possible vacuum leak, low compression, overly retarded timing or too large a plug gap.
If the deposits are wet, it can be an indication of a breached head gasket, poor oil control from ring or valvetrain problems or an extremely rich condition - depending on the nature of the liquid present at the firing tip.
Signs of fouling or excessive heat must be traced quickly to prevent further deterioration of performance and possible engine damage.
 | Normal Condition An engine's condition can be judged by the appearance of the spark plug's firing end. If the firing end of a spark plug is brown or light gray, the condition can be judged to be good and the spark plug is functioning optimally. |
 | Dry and Wet Fouling Although there are many different cases, if the insulation resistance between the center electrode and the shell is over 10 ohms, the engine can be started normally. If the insulation resistance drops to 0 ohms, the firing end is fouled by either wet or dry carbon. |
 | Overheating When a spark plug overheats, deposits that have accumulated on the insulator tip melt and give the insulator tip a glazed or glossy appearance. |
 | Deposits The accumulation of deposits on the firing end is influenced by oil leakage, fuel quality and the engine's operating duration. |
 | Lead Fouling Lead fouling usually appears as yellowish brown deposits on the insulator nose. This can not be detected by a resitsance tester at room temperature. Lead compounds combine at different temperatures. Those formed at 370-470°C (700-790°F) having the greatest influence on lead resistance. |
 | Breakage Breakage is usually caused by thermal expansion and thermal shock due to sudden heating or cooling. |
 | Normal Life A worn spark plug not only wastes fuel but also strains the whole ignition system because the expanded gap (due to erosion) requires higher voltages. Normal rates of gap growth are as follows: Four Stroke Engines: 0.01~0.02 mm/1,000 km (0.00063~0.000126 inches/1,000 miles) Two Stroke Engines: 0.02~0.04 mm/1,000 km (0.000126~0.00252 inches/1,000 miles) |
 | Abnormal Erosion Abnormal electrode erosion is caused by the effects of corrosion, oxidation and reaction with lead - all resulting in abnormal gap growth. |
 | Melting Melting is caused by overheating. Mostly, the electrode surface is rather lustrous and uneven. The melting point of nickel alloy is 1,200~1,300°C (2,200~2,400°F). |
 | Erosion, Corrosion and Oxidation The material of the electrodes has oxidized, and when the oxidation is heavy it will be green on the surface. The surface of the electrodes are also fretted and rough. |
 | Lead Erosion Lead erosion is caused by lead compounds in the gasoline which react chemically with the material of the electrodes (nickel alloy) as high temperatures; crystal of nickel alloy fall off because of the lead compounds permeating and seperating the grain boundary of the nickel alloy. Typical lead erosion causes the surface of the ground electrode to become thinner, and the tip of the electrode looks as if it has been chipped. straight for the ngk website |
adjusting the carb
If there's any one component that's more likely to go out of adjustment on your scooter (especially perhaps your Chinese scooter!), it's the carburetor. If it does go out of adjustment lots of things can happen. It can make the scooter hard to start, it can make the scooter slow to accelerate, it can cause the scooter to idle badly and stall or it can make the scooter idle fast so that it's trying to go all the time and needs the brake to hold it stationary. None of these things are good.
What the carburetor does is regulate the amount of fuel and air which are supplied to the engine. To go faster you need more fuel and more air and they must be in the right proportion. The fuel also has to be atomized as much as possible (i.e. be supplied in tiny droplets). The carburetor controls all these functions and generally does it quite well.
The type of carburetor used on most 150cc GY6 type engines is a Keihin style CV carburetor with a 24mm throat. Keihin design carburetors are a well tried and tested design developed in Japan (Keihin is a region near Tokyo).
Without removing and disassembling the carburetor, there are only two adjustments you can make, but these should take care of most minor problems. The first is the adjustment of the idle speed.
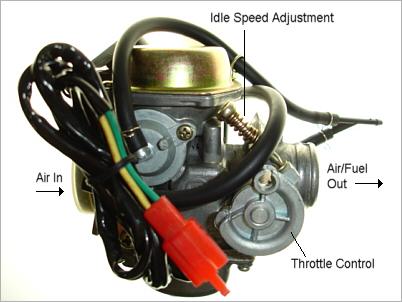
The other adjustment you can make is to the low speed fuel/air ("mixture") ratio. This is done on most scooters using a screw adjustment on the other side of the carburetor as shown below.
You may need to go back to the idle speed screw to lower the idle speed if it's now too fast. So the basic procedure is to set the fuel/air mixture to give you the fastest idle, then use the idle speed adjustment to set the speed to the lowest rpm that gives you smooth running.
If the scooter idles well and runs fine at low speed, but has problems at high speed, the problem may lie inside the carburetor with the main jet. The fuel/air ratio at higher speeds is set by the jets inside the carburetor and to get at them the carburetor has be be removed and disassembled. This can be a tricky job as the parts are small and delicate. The good news is that these carburetors are quite cheap. You can get a new one for $50-$60, so if you can't make your scooter run smoothly and you don't like the idea of taking the carburetor apart, you can always replace it!
What the carburetor does is regulate the amount of fuel and air which are supplied to the engine. To go faster you need more fuel and more air and they must be in the right proportion. The fuel also has to be atomized as much as possible (i.e. be supplied in tiny droplets). The carburetor controls all these functions and generally does it quite well.
The type of carburetor used on most 150cc GY6 type engines is a Keihin style CV carburetor with a 24mm throat. Keihin design carburetors are a well tried and tested design developed in Japan (Keihin is a region near Tokyo).
Without removing and disassembling the carburetor, there are only two adjustments you can make, but these should take care of most minor problems. The first is the adjustment of the idle speed.
The other adjustment you can make is to the low speed fuel/air ("mixture") ratio. This is done on most scooters using a screw adjustment on the other side of the carburetor as shown below.
You may need to go back to the idle speed screw to lower the idle speed if it's now too fast. So the basic procedure is to set the fuel/air mixture to give you the fastest idle, then use the idle speed adjustment to set the speed to the lowest rpm that gives you smooth running.
If the scooter idles well and runs fine at low speed, but has problems at high speed, the problem may lie inside the carburetor with the main jet. The fuel/air ratio at higher speeds is set by the jets inside the carburetor and to get at them the carburetor has be be removed and disassembled. This can be a tricky job as the parts are small and delicate. The good news is that these carburetors are quite cheap. You can get a new one for $50-$60, so if you can't make your scooter run smoothly and you don't like the idea of taking the carburetor apart, you can always replace it!
a little fun info on ocatne rating
The swami has been hearing a lot of nonsense around the gas pumps these days. People are tanking up with the "good" stuff because the commercials imply that it's better for their engine. When the oil companies use superlatives like "Super", "Extra" and "High"...well it must be better, right? And of course they wouldn't be charging $0.10 - $0.20 more unless they were putting some really good stuff in there, right? Sorry...NOT!
"High Octane" is not synonymous with "good" or "better", and does not mean that it is better for your engine! And the chances are pretty good you don’t need high octane fuel in your scooter.
High-octane fuels only become necessary when your engine has a high compression ratio. It’s a very long and complicated story…that the swami will make short.
First important fact that you must accept:
All gasoline, regardless of its’ octane rating, have pretty much the same amount of energy per gallon. What!!! "Sacrilege" you say? Well, actually, some higher-octane fuels have a few LESS percent energy per gallon…so as not to argue over this small point, for the sake of this discussion we will all agree that the automotive gasoline that you buy at the pump, regardless of octane rating, has the same amount of potential energy.
Second important fact that you must accept:
Octane is NOT a measure of power but of the fuels’ resistance to ignition from heat. A higher-octane fuel, under identical combustion chamber conditions, will burn slower.
How can this be? If all of the above is true, how do we get more power out of high octane gasoline? We do, don’t we?
Well…yes we do. Here’s how:
But first you must understand "heat of compression". There is a 2,000 year old fire starting device that still amazes the swami. A length of bamboo was hollowed out leaving one end capped. A stick, about the same length as the bamboo, was whittled down until it fit snugly into the bamboo cylinder. A bit of dried grass or wood shavings were placed in the bottom of the bamboo cylinder and the snugly fitting stick was violently rammed down the bamboo tube. The heat generated from rapidly compressing the air in the tube was sufficient to ignite the tinder.
The same thing can happen in the cylinder of an engine. The piston, quickly squeezing the fuel/air mixture into a small space, can generate enough heat of compression to ignite the fuel well before the spark plug fires, with unpleasant results. If the fuel prematurely ignites while the piston is on its way up, the burning of the fuel, in conjunction with the rising piston, creates even more pressure, resulting in a violent explosion. This explosion is equivalent to hitting the top of the piston with a very large hammer. If you want to be able to see through the top of your piston, ignore those sounds that are usually called: "pre-ignition", "ping" or "engine knock". Trust me on this one; in his reckless youth, using this method, the swami turned a few pistons into paper weights.
What we really want is a very rapid burn of the fuel, not an explosion. And we want the burning of the fuel to take place while the piston is in a better position to convert this pressure into productive work, like on its way down. Think of this burning as a very fast "push" on the top of the piston. Despite the violent noises you hear from some exhaust systems, it really is a rapid push on the top of the piston making the crankshaft go around, not explosions.
So that we can ignite the fuel at exactly the right time with the spark plug, instead of from the heat of compression, they put stuff into gasoline to keep it from igniting prematurely. The more resistant the fuel is to ignition from the heat of compression, the higher its octane rating.
Are you with me so far?
Higher compression ratios = higher combustion chamber pressures = higher heat… and it is with these higher combustion chamber temperatures that the magic happens.
At higher temperatures the fuel is burned more efficiently. So, while it’s true that the higher-octane fuel does not posses any more energy than low octane fuel, the increased octane allows the extraction of more of the potential energy that has always been there. Conversely, lower compression ration engines utilize a little less of the fuel energy potential (2-4% reduction) but there is also less heat generated in the combustion process.
So how do you know if you need high-octane fuel? The swami suggests you look in the owners’ manual! Manufacturers really do want you to get the maximum efficiency out of your engine. They do their best to give a good balance between horsepower and engine life. It’s in their best interests to do so.
There is ABSOLUTELY NO BENEFIT to using a higher octane than your engine needs. The only benefit is increased profits to the oil companies that have cleverly convinced some of the public that their new "Super-Duper, Premium-High-Test, Clean-Burning, Used-By-Famous-Racing-Types-All-Around-The-World, Extra-Detergent-Laden-Keep-Your-Pipes-Clean, Extra-High-Octane" fuel is your engines’ best friend. The swami is telling you the truth, don’t listen to that talking cartoon car.
The swami hears people insisting that they got better mileage, better acceleration, and less dental plaque by switching to a high-octane fuel. The swami reminds these people that in every pharmacy is a special miracle pill that is often prescribed by doctors, it works wonders because people believe that it works wonders; it’s called a "placebo". The swami warns: never confuse faith with physics!
If you are getting pinging or knocking with what should be the correct octane for your engine, start by checking the ignition timing, also check that the spark plug is the correct heat range. For 2-strokes, check for excessive carbon build-up on the top of the piston, the carbon takes up space and increases the compression ratio.
If all is well and correct, and you still are getting knocking, then try the next higher octane. You won’t go faster, you won’t go farther, but you will prevent an unsightly hole in your piston.
This subject is a whole lot more complicated than the swami wants to bother with. If you are curious to know more, put some of these words into your search engine and enjoy the education:
Antiknock Index
Octane
Stoichiometric Combustion
Thermal Efficiency
Flame Front
Highest Useful Compression Ratio
Compression Ratio
Placebo
replacing lost exhaust head nuts
If you lose one of these cap nuts that hold on the exhaust header, you'll have trouble finding one locally. Online they can be very expensive.....as much as $12 ea.
Here's a cheap replacement.....they're called "extenders", available in various thread sizes at Ace Hardware $1.69ea. This one happens to be 8mm. The reason a long nut is better than a normal nut....easier to install in an awkward area. The OEM cap nut is on the left....
![[image]](http://i5.photobucket.com/albums/y159/Bluefront/scooters/nut2.jpg "[image]")
I never have liked cap nuts in any application. They look neat and hide the threads of the stud/bolt, but they trap moisture and can rust solid. And since the end is closed, you can't spray any rust-buster on the threads.
So I switched over to a set of these extenders. And I drilled a set of holes near one end.....
![[image]](http://i5.photobucket.com/albums/y159/Bluefront/scooters/nut3.jpg "[image]")
The holes.....used for a safety-wire. When wired together after the installation, they won't fall off. Pretty neat. I coat the threads with adhesive silicone to prevent loosening, and spray some lube into the openings from time to time.....works well.
![[image]](http://i5.photobucket.com/albums/y159/Bluefront/scooters/nut1.jpg "[image]")
Here's a cheap replacement.....they're called "extenders", available in various thread sizes at Ace Hardware $1.69ea. This one happens to be 8mm. The reason a long nut is better than a normal nut....easier to install in an awkward area. The OEM cap nut is on the left....
I never have liked cap nuts in any application. They look neat and hide the threads of the stud/bolt, but they trap moisture and can rust solid. And since the end is closed, you can't spray any rust-buster on the threads.
So I switched over to a set of these extenders. And I drilled a set of holes near one end.....
The holes.....used for a safety-wire. When wired together after the installation, they won't fall off. Pretty neat. I coat the threads with adhesive silicone to prevent loosening, and spray some lube into the openings from time to time.....works well.
troubleshooting no spark issues
To accurately diagnose your ignition system, you will need to do each of these steps in sequence. Start with step 1 and work through this guide completely.
This guide was originally written for the Yerf-Dog GX150, but has been re-written to cover almost any of the 150cc buggies, scooters, or ATV's with the standard "AC" CDI setup.
-----------
The 150cc GY6 ignition system is fairly easy to troubleshoot in the case of malfunction. There are 4 major components that work together to produce spark, if any of these is defective, spark will be lost. What we will be doing here is troubleshooting these ignition parts.
Ignition energy travels along the following path starting at the stator:
--1. Stator (6th winding and trigger pickup module)
--2. CDI unit
--3. Ignition coil
--4. Spark plug
| First, bypassing your switches |
| A very common cause of no spark is a defective ignition or kill switch. Before beginning to troubleshoot ignition problems, it is best to bypass the switches. Some GY6 vehicles like the Yerf Dog GX150 have only one switch, but most others have two. The bypass process is the same. Bypassing the switches 1. Reference this pinout diagram. 2. Create a jumper wire from pin #4 directly to a good grounding spot on the engine. 2. Remove the #5 wire from the CDI plug at the harness. This can be done with a sharp narrow tool like an ice pick or stiff paper clip. Looking from the front of the plug, you will see small metal tabs on each pin which secure them to the plug. Push the tab down and the pin will release. Be careful not to break the plug or pin. |
| Stator (Ignition winding and trigger pickup module) |
| Ignition winding: Depending on your stator type, you have either 6, 8, or 11 windings. Of these windings, one is dedicated to supplying the CDI with ignition power. This winding is usually wrapped in white cloth material and sealed over with clear epoxy. Trigger pickup: A simple type of crankshaft position sensor. Sends a signal to the CDI to let it know when to send fire to the plug. Troubleshooting the Stator: 1. Set your multimeter to read in VOLTS "AC". 2. Locate and disconnect the Black/Red and Blue/Yellow wires coming from the stator, where they plug into the main engine harness. (These are both bullet-style connectors) 3. While cranking the engine, use a multimeter to check for voltage coming from the Red/Black (CDI power wire) and the Blue/Yellow (trigger wire) coming from stator. Place the black lead of multimeter on a metal surface of the engine while using the red lead on the tips of the wires. 4. There should be between 20vAC ~ 100vAC coming from the CDI power wire (Black/Red), although much lower voltages will still be able to produce spark. 5. There should be at least 0.05vAC coming from the trigger wire (Blue/Yellow). 6. Write the voltages down and continue to the next step. Normal values: Stator output: 20vAC minimum. Trigger output: 0.5vAC minimum. |
| The CDI Unit |
| The CDI unit is powered by the AC current coming from the wrapped stator winding. This current is stored in a capacitor within the CDI unit. When a signal is received by the trigger pickup passing over the flywheel magnet, the CDI will discharge the stored energy into the wires leading to the ignition coil. Troubleshooting the CDI: 1. Ensure your multimeter is set to read in VOLTS "AC". 2. Just like before: while cranking the engine, use a multimeter to check for voltage at the two primary wires of the ignition coil. Connect your back multimeter lead to the black ground wire at the coil, and with the red lead to the lighter color wire (usually blue or purple, but it varies). At this step we are checking to see exactly what the CDI is outputting. Write the voltages down and continue to the next step. Normal values: CDI output: Can be 5% to 30% less than the output from the stator. The minimum we have seen working is around 18vAC. |
| The Ignition Coil |
| The function of the ignition coil is to multiply the voltage of the power supplied from the CDI, and to send the multiplied power to the spark plug. Troubleshooting the Ignition Coil: Check for 0.1 ohm ~ 1.0 ohm across the two primary coil terminals. This isn't exactly definitive, as we have seen working coils with 0.0ohms resistance. The best way to tell if the coil is bad is to perform steps the steps above. If there is still no spark, the coil is likely bad. |
| The Spark Plug |
| The plug is very rarely the cause of no spark on the GY6. If the plug is fouled or cracked it may not spark. Ensure that the spark plug is gapped properly. Recommended spark plug gap: 0.6mm ~ 0.7mm (0.23" ~ 0.27") |
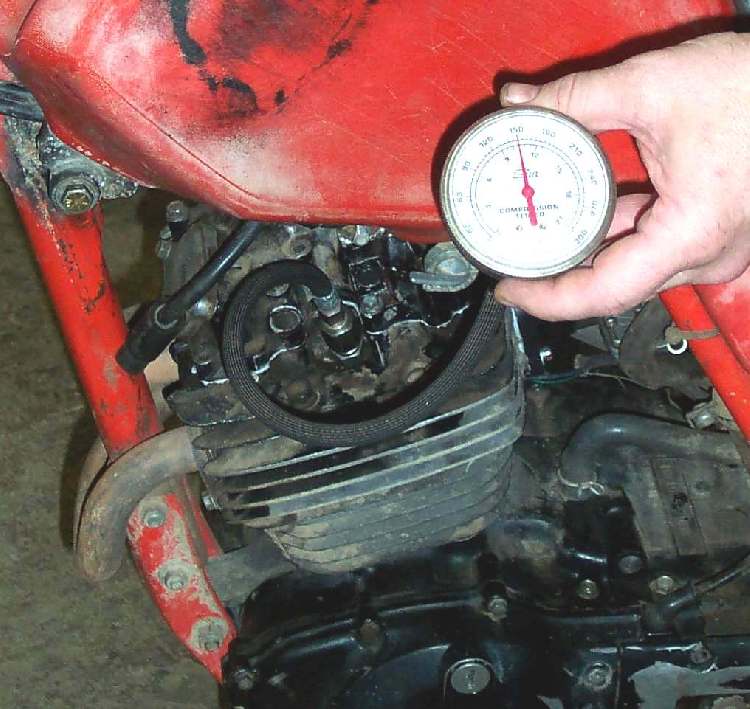
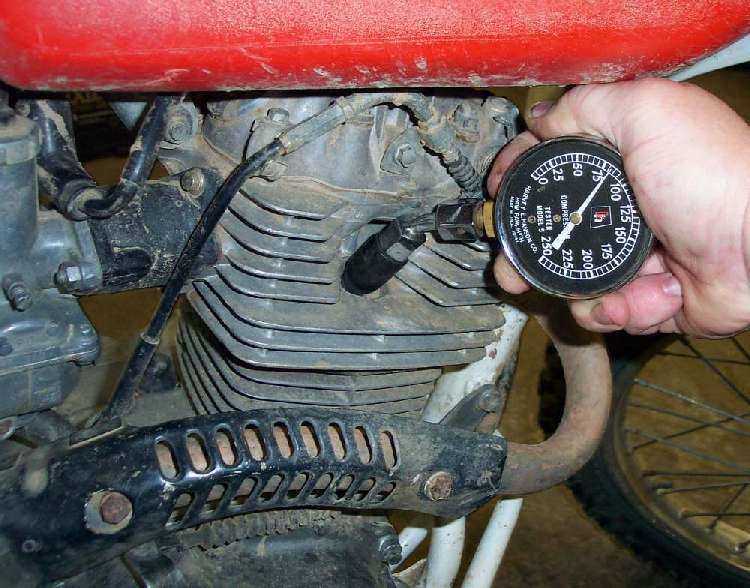
how to check for compression
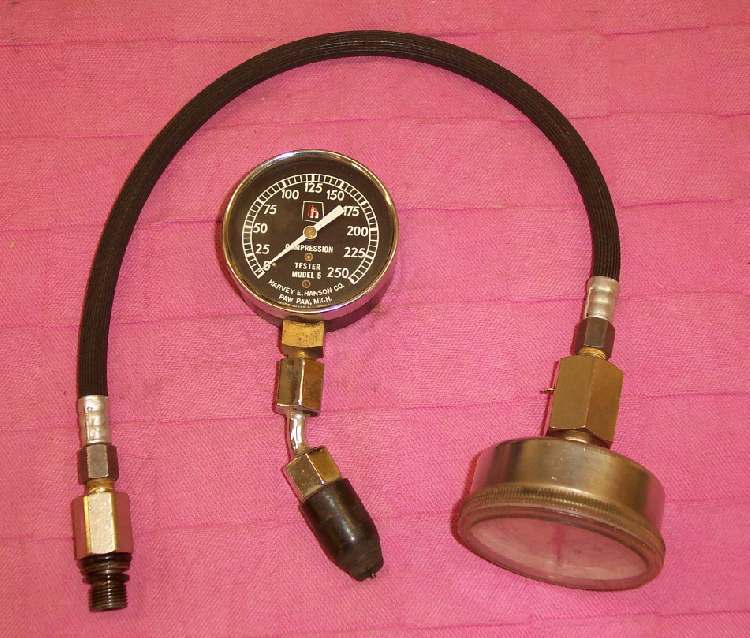
You can have the hottest cam, perfect ignition timing, clean carburetor, and fresh gas, but without good compression... that engine is not going to run. The first thing I do, when a non running bike comes in, is to run a compression test. If the engine does not have at least 100 PSI (Pounds per Square Inch) in each cylinder, I won't work on it, except to rebuild it. It would be a waste of the customers money if I "Tried" to make it run.
100 PSI is the minimum. It should be 125 to 150, and some engines have as high as 170 PSI or more. Yes, an engine can run with lower compression, but it will run very poorly. I've seen old, big, multi-cylinder outboards run with as little as 65 PSI and some lawnmowers run even less. However, for motorcycle engines 100 PSI is really on deaths doorway. Use your time to rebuild the engine, not to get another five or ten hours of life (maybe !) out of it.
The drill is simple. Remove all the spark plugs, ground all the spark plug wires or turn off the ignition, if possible. Screw or push the end of the gauge into the spark plug hole, open the throttle wide, and kick away. I like to kick (or turn the engine over with the electric starter) about four to five times and then check the gauge. Remember the reading, release the pressure on the gauge, by pushing the little releases, and do it again. If the reading changes, do it till you get several readings that are all the same. That would be the correct pressure.
When you remove the spark plug, it might be a good idea to loosen the plug a bit and then blow out and around the plug with compressed air. This is to blow out any bits of dirt that might fall into the engine through the spark plug hole, as you remove the plug. This is an especially good idea on dirt bike engines with deep, forward facing, spark plug holes.
Technically, You should do this when the engine is hot, but I don't like burning my fingers, so I always do it when the engine is cold. A hot engine would probably read a few pounds more, but a cold reading will tell you what you need to know. Run the test on each cylinder. All the cylinders on an engine should be within ten pounds of each other. In other words, a four cylinder engine reading 145 PSI, 150 PSI, 147 PSI, and 155 PSI would be considered good. If it had 135 PSI, 150 PSI, 150 PSI and 155 PSI, it would not be considered good. Something is starting to go wrong with that first cylinder. OK, you have a cylinder that reads low. Is it valves or rings, leaking that compression ? A quick, down and dirty test is this. Squirt some oil, maybe a teaspoon's worth, into the cylinder through the spark plug hole. Now run the test again. The oil will hold compression for several turns of the engine. If your retest with oil gives higher compression, you will know the rings are worn. If there is no change in compression, it's the valves that are leaking. If you think it's the valves, it's always a good idea to check the valve tappet clearance. If the valves are tight, they could be leaking compression. If the valves are tight, reset them to the proper clearance and test again. if your compression comes back don't thank your luck, thank Jesus ! He just saved you an engine rebuild.
This test is one of the most important tests you can make. Time and time again, I see people work for hours trying to get an engine to run or to run good. I ask "Did you run a compression test ?" they say "Oh, it has compression" I ask again, "Did you do an actual test ? What was the PSI ?" They say "It feels like it does !" So they run a test, and guess what ? No, or little, compression. Don't waste you time on a dead engine. Run a compression test first thing.
If you have an engine with Constant Velocity carbs the test is still done the same, with the throttles wide open. You might think they would read different, but they don't seem to.
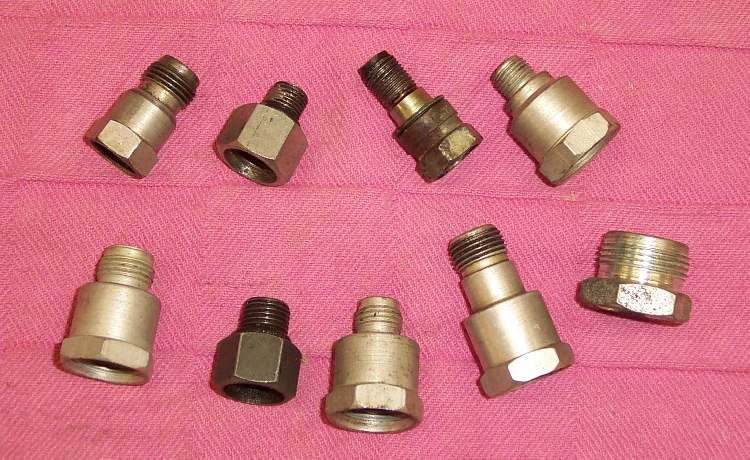
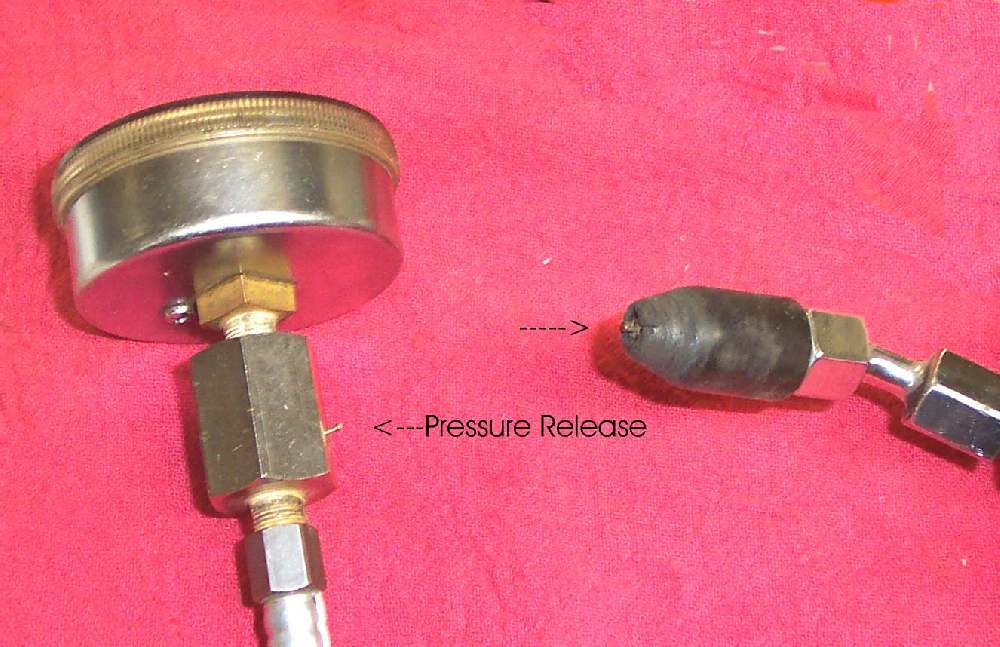
 Sometimes the spark plug holes are kind of weird in the size department and you will have to use an adapter on the end of the compression tester gauge. You can get a lot of different types of adapters, but sometimes you may need a special adapter that no one sells. You can try to use the push type of tester. It has a rubber tip that fits into the spark plug hole and is held there by hand pressure. Sometimes, due to the position of the spark plug, that will not work. If you can't buy the right adapter you can make one out of an old spark plug.
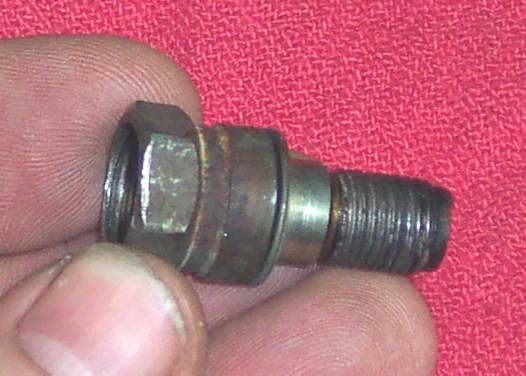
 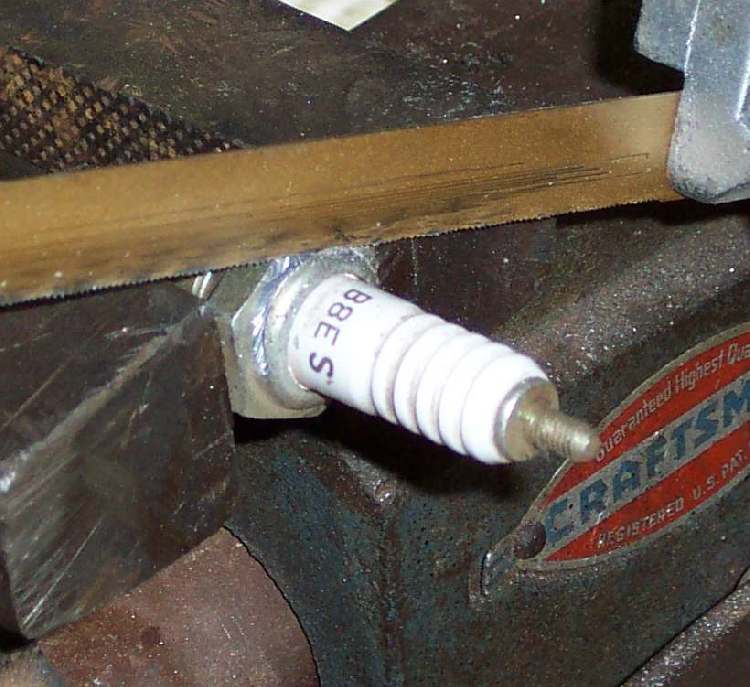 To make one, simply take a spark plug that fits the engine you want to test and remove the part of the metal base that is crimped over the ceramic portion of the spark plug. You can do this with a hack saw, and the crimped part will come loose like a ring. Now you can knock the ceramic part of the plug out with a drift from the nose end of the plug. This leaves you with just the metal portion of the plug. Now you can cut threads inside the end with a tap, like the one above, or weld it up with metal and redrill it to the right hole size if the plug is too big to tap as is.
 If you don't have a compression gauge handy, all is not lost. A down and dirty way to do it is to simply press your thumb over the spark plug hole and hold it there tight. Now have someone kick the engine over. No matter how hard you push your thumb, the compression pressure should blow it off the hole smartly. If it won't, you don't have enough compression to start the engine.
Tuesday, July 26, 2011
runs but doesnt run well enough
If your scooter starts but won't rev or run well, there are basically five most probable areas of trouble:
If the scooter starts, it must be getting some sort of spark, but the spark may be weak or there may be a problem with the ignition timing. The first thing to do is remove the spark plug and take a look at it. If there are heavy deposits on the tip (black or white), or if it looks worn or damaged or if the gap isn't what it should be, it should be replaced. You could clean it and regap it but plugs are cheap ($5 or less), so you should probably replace it anyway and see if the engine runs better. If there's no difference, at least you now have a spare plug if the one in the engine ever does fail!
Today there are very few scooter engines on which you can alter the ignition timing. All timing functions are done via the CDI (Capacitor Discharge Ignition) module. If it's bad, all you can really do is replace it. They're pretty reliable though, so that might be something to try if all else fails to find a problem.
Leaks in the air or vacuum lines can cause problems too. Usually it's leaks in the vacuum lines which control several functions related to the carburetor operation and fuel supply. First check all the vacuum line connection and the lines themselves for splits and cracks. If they look OK you can spray water on them while the engine is running and see if there is any change in engine speed. If there's a leak, the liquid will temporarily seal it and the engine will run better. Some recommend spraying WD40 or carburetor cleaning fluid on the lines, but if you do there can be a risk of fire, so be careful.
Carburetor problems are the most likely source of poor running. First check the idle speed and air/fuel mixture screws (see carburetor adjustment). If the adjustment is OK, or you can't get the engine to idle well, then comes the next step. Over time (especially if the scooter is stored for long periods of time with gas in the carburetor), "gummy" deposits can build up. These are the residues which are left behind when gas evaporates. They can clog internals valves, jets and passages inside the carburetor which can affect fuel flow. The best way to deal with them is to remove the carburetor from the scooter (see carburetor rejetting), take it apart and soak it in carburetor cleaning fluid, which will dissolve the deposits. Make sure the jets are clear too.
Valve clearance ("valve lash", "tappet clearance") can affect the way the engine runs. This is the clearance between the camshaft and the valve stem. If it is too large, the valve won't open all the way (and you'll get a loud "clattering" noise) and if it is too small (or non-existent), the valve may not properly close. Either way is a problem. You either won't get fuel/air into the cylinder properly or you won't get good compression and/or exhaust and the valve may overheat and suffer damage.
If you can't find any timing marks for TDC you can rotate the engine clockwise the cam lobe is about 180 degrees away from the rocker arm. This means that the clearance between the rocker arm and the valve should be at it's maximum and you should be able to wriggle the rocker arm back and forth a bit (that's the clearance). You can also remove the spark plug, put a straw into the cylinder and rotate the engine until you feel the piston is at its maximum height both valves are fully closed (note that there are two position in a 4-stroke engine at which the piston is at it's maximum height in the cylinder. Be sure you get the right one). Once you're at TDC, loosen the locking nut and adjust the clearance using a set of feeler gauges. When you have it set correctly, tighten down on the lock nut, and re-check it. Now do the same thing again for the other valve. For most 150cc GY6 engines the clearance should be around .004", but check your manual. For 50cc engines I've seen .002" recommended.
- Problems with fuel flow
- Problems with the spark
- Air/vacuum leaks
- Problems with the carburetor
- Problems with valve clearance
If the scooter starts, it must be getting some sort of spark, but the spark may be weak or there may be a problem with the ignition timing. The first thing to do is remove the spark plug and take a look at it. If there are heavy deposits on the tip (black or white), or if it looks worn or damaged or if the gap isn't what it should be, it should be replaced. You could clean it and regap it but plugs are cheap ($5 or less), so you should probably replace it anyway and see if the engine runs better. If there's no difference, at least you now have a spare plug if the one in the engine ever does fail!
Today there are very few scooter engines on which you can alter the ignition timing. All timing functions are done via the CDI (Capacitor Discharge Ignition) module. If it's bad, all you can really do is replace it. They're pretty reliable though, so that might be something to try if all else fails to find a problem.
Leaks in the air or vacuum lines can cause problems too. Usually it's leaks in the vacuum lines which control several functions related to the carburetor operation and fuel supply. First check all the vacuum line connection and the lines themselves for splits and cracks. If they look OK you can spray water on them while the engine is running and see if there is any change in engine speed. If there's a leak, the liquid will temporarily seal it and the engine will run better. Some recommend spraying WD40 or carburetor cleaning fluid on the lines, but if you do there can be a risk of fire, so be careful.
Carburetor problems are the most likely source of poor running. First check the idle speed and air/fuel mixture screws (see carburetor adjustment). If the adjustment is OK, or you can't get the engine to idle well, then comes the next step. Over time (especially if the scooter is stored for long periods of time with gas in the carburetor), "gummy" deposits can build up. These are the residues which are left behind when gas evaporates. They can clog internals valves, jets and passages inside the carburetor which can affect fuel flow. The best way to deal with them is to remove the carburetor from the scooter (see carburetor rejetting), take it apart and soak it in carburetor cleaning fluid, which will dissolve the deposits. Make sure the jets are clear too.
Valve clearance ("valve lash", "tappet clearance") can affect the way the engine runs. This is the clearance between the camshaft and the valve stem. If it is too large, the valve won't open all the way (and you'll get a loud "clattering" noise) and if it is too small (or non-existent), the valve may not properly close. Either way is a problem. You either won't get fuel/air into the cylinder properly or you won't get good compression and/or exhaust and the valve may overheat and suffer damage.
valve adjustments for 50cc and 150cc scooters
Valve adjustment on a 139QMB 50cc 4 stroke scooter motor.
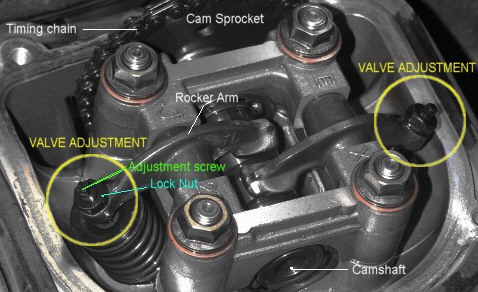
You will need access to the engine bay. For me the easiest way to do this is to remove the seat bucket. But everyone has their own way and there is many different configurations of scooters. What your looking to do first is to have access to the top of the motor. After you get the valve cover removed with 8mm socket or wrench you will need to follow these steps.
Step 1.
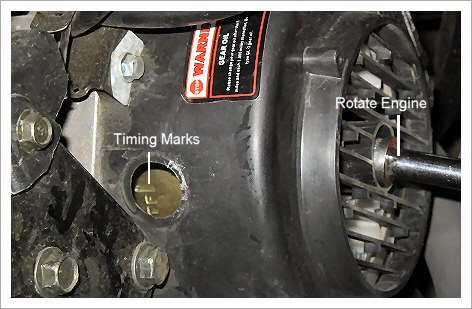
Set the engine to Top Dead Center (TDC)
On your flywheel you will see some marks. Make sure the T on the flywheel lines up with the the timing tab.
![[image]](http://i465.photobucket.com/albums/rr16/antisocialsc/bealinged.jpg "[image]")
Also check your camshaft and make sure your timing marks on line up with the top of the head. Make sure that you are setting the engine at TDC on compression stroke. The T that lines up with the timing tab after the intake valve closes.
![[image]](http://i465.photobucket.com/albums/rr16/antisocialsc/bealinged2.jpg "[image]")
After that is a simple matter of using a standard feeler gauge and set the valve lash at .004 for both the intake and exhaust valves. How do you do that you ask. Its simple really just take your 9mm wrench and loosen the locking nut on the valve tappet.
Then you loosen the tappet until you can get your feeler gauge between the tappet and the valve stem. You want to tighten the tappet down on the feeler gauge snug but not to tight. You want to be able to pull the feeler gauge out but there should be resistance. Use a pair of needle nose pliers to hold the head of the tappet and tighten down the locking nut. Repeat on the other side and put the valve cover back on.
![[image]](http://modvespa.com/wp-content/uploads/2008/07/valve-adjustment.jpg "[image]")
Once you get the motor back together you want to start it up and listen for excessive tapping from the valves. A tick is ok a loud tap is a problem. If it sounds weird start back at step one and try again.
You will need access to the engine bay. For me the easiest way to do this is to remove the seat bucket. But everyone has their own way and there is many different configurations of scooters. What your looking to do first is to have access to the top of the motor. After you get the valve cover removed with 8mm socket or wrench you will need to follow these steps.
Step 1.
Set the engine to Top Dead Center (TDC)
On your flywheel you will see some marks. Make sure the T on the flywheel lines up with the the timing tab.
Also check your camshaft and make sure your timing marks on line up with the top of the head. Make sure that you are setting the engine at TDC on compression stroke. The T that lines up with the timing tab after the intake valve closes.
After that is a simple matter of using a standard feeler gauge and set the valve lash at .004 for both the intake and exhaust valves. How do you do that you ask. Its simple really just take your 9mm wrench and loosen the locking nut on the valve tappet.
Then you loosen the tappet until you can get your feeler gauge between the tappet and the valve stem. You want to tighten the tappet down on the feeler gauge snug but not to tight. You want to be able to pull the feeler gauge out but there should be resistance. Use a pair of needle nose pliers to hold the head of the tappet and tighten down the locking nut. Repeat on the other side and put the valve cover back on.
Once you get the motor back together you want to start it up and listen for excessive tapping from the valves. A tick is ok a loud tap is a problem. If it sounds weird start back at step one and try again.
basic no start troubleshooting
To start a scooter needs three things:
Most scooters have four things that need to be done before they can be started with the electric starter:
If the scooter doesn't turn over when you've done all the required operations, there's an electrical problem with the battery. Make sure the battery is charged. If it is, make sure the fuse hasn't blown. If it hasn't, check to see if you are getting voltage to the starter motor terminals. If you are, the starter motor is likely defective. Many scooters have a kick start (see your manual). If the battery is OK and the starter motor doesn't work, try kickstarting it. It's usually not too hard. My scooter usually starts OK on the 2nd or 3rd kick.
If the scooter does turn over but still doesn't start you have to check for a spark and make sure gas is getting to the engine. To check for a spark, remove the spark plug from the cylinder, hold the tip of the plug against the cylinder head and crank the engine. You should see a spark across the gap. If you don't, there's a problem with the ignition. Could be a faulty coil or electronic ignition module which will have to be replaced, or it could just be a lose wire.
If you do have a spark, you need to check the gas. Make sure there is gas in the tank first! If there is you need to check the fuel valve. Most scooters use a gravity fuel feed by locating the fuel tank higher than the carburetor. The fuel usually then flows through filter and then through a vacuum operated valve. The valve has three hoses connected to it. One if from the fuel tank and is for the gas going in, one is connected to the carburetor and is for the gas coming out and one goes to the engine manifold which provides a vacuum. If you disconnect the hose from the carburetor, fuel should run out when you crank the engine (be careful to catch the gas if you do this and don't do it with a hot engine). If you don't see gas the fuel valve may be faulty. You can try applying a vacuum to the control port of the valve and see if the fuel flows. Sucking on the line is one way to do this (but make sure it's the vacuum line, not the gas line if you try this!).
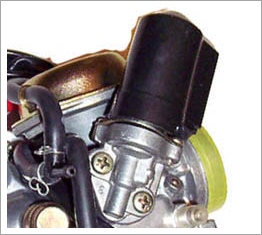 If you are getting a spark and you are getting gas to the carburetor and the engine is turning over on the starter OK, it's possible that the electrically operated automatic choke has failed. It's supposed to operate when the engine is cold, but if it's stuck or burned out, the mixture will be weak and the scooter probably won't start. The automatic choke is usually a black cylindrical object attached to the carburetor with a couple of wires coming out of it as shown on the left. It's the only electrical powered component attached to the carburetor, so it's usually not hard to spot. If you have a voltmeter you can measure the resistance across the leads of the choke. It should be somewhere in the region of around 10 or 20 ohms. If it's an open circuit, it's burned out and will need to be replaced. If it seems to be OK it may be stuck, or the wiring to it may have a problem. Check to see that it's getting voltage.
It's also possible that there is a problem with the carburetor and if so you may need to remove it and clean it out. If the scooter has been sitting for a few months with gas in the carburetor, the gas may have evaporated and left a sticky "gum" behind that will prevent the carburetor from working properly and which must be removed.
If the automatic choke is OK, the starter cranks the engine, there's gas and there's a spark then there may be an engine problem. You need to check the cylinder compression. You need a compression tester to do this. It screws in instead of the spark plug and measures cylinder pressure. When you crank the engine you should see a reading of around 150 psi or more. If it's 100 psi or less there's likely and engine problem (bad valve, bad piston, failed piston rings) which will need the engine taken apart to find.
Probably the most common problems are a dead battery or carburetor problems due to bad adjustment or build up of gummy deposits. Carburetor problems usually come on slowly though. If a scooter is OK one day and refuses to start the next day, I'd first suspect an electrical problem.
- Gas
- A spark
- Cylinder compression
Most scooters have four things that need to be done before they can be started with the electric starter:
- The ignition has to be turned on
- The kill switch (usually near the right grip) has to be in the "on" position
- The rear (left) brake lever has to be squeezed.
- The starter button must be pressed.
If the scooter doesn't turn over when you've done all the required operations, there's an electrical problem with the battery. Make sure the battery is charged. If it is, make sure the fuse hasn't blown. If it hasn't, check to see if you are getting voltage to the starter motor terminals. If you are, the starter motor is likely defective. Many scooters have a kick start (see your manual). If the battery is OK and the starter motor doesn't work, try kickstarting it. It's usually not too hard. My scooter usually starts OK on the 2nd or 3rd kick.
If the scooter does turn over but still doesn't start you have to check for a spark and make sure gas is getting to the engine. To check for a spark, remove the spark plug from the cylinder, hold the tip of the plug against the cylinder head and crank the engine. You should see a spark across the gap. If you don't, there's a problem with the ignition. Could be a faulty coil or electronic ignition module which will have to be replaced, or it could just be a lose wire.
If you do have a spark, you need to check the gas. Make sure there is gas in the tank first! If there is you need to check the fuel valve. Most scooters use a gravity fuel feed by locating the fuel tank higher than the carburetor. The fuel usually then flows through filter and then through a vacuum operated valve. The valve has three hoses connected to it. One if from the fuel tank and is for the gas going in, one is connected to the carburetor and is for the gas coming out and one goes to the engine manifold which provides a vacuum. If you disconnect the hose from the carburetor, fuel should run out when you crank the engine (be careful to catch the gas if you do this and don't do it with a hot engine). If you don't see gas the fuel valve may be faulty. You can try applying a vacuum to the control port of the valve and see if the fuel flows. Sucking on the line is one way to do this (but make sure it's the vacuum line, not the gas line if you try this!).
If you are getting a spark and you are getting gas to the carburetor and the engine is turning over on the starter OK, it's possible that the electrically operated automatic choke has failed. It's supposed to operate when the engine is cold, but if it's stuck or burned out, the mixture will be weak and the scooter probably won't start. The automatic choke is usually a black cylindrical object attached to the carburetor with a couple of wires coming out of it as shown on the left. It's the only electrical powered component attached to the carburetor, so it's usually not hard to spot. If you have a voltmeter you can measure the resistance across the leads of the choke. It should be somewhere in the region of around 10 or 20 ohms. If it's an open circuit, it's burned out and will need to be replaced. If it seems to be OK it may be stuck, or the wiring to it may have a problem. Check to see that it's getting voltage. It's also possible that there is a problem with the carburetor and if so you may need to remove it and clean it out. If the scooter has been sitting for a few months with gas in the carburetor, the gas may have evaporated and left a sticky "gum" behind that will prevent the carburetor from working properly and which must be removed.
If the automatic choke is OK, the starter cranks the engine, there's gas and there's a spark then there may be an engine problem. You need to check the cylinder compression. You need a compression tester to do this. It screws in instead of the spark plug and measures cylinder pressure. When you crank the engine you should see a reading of around 150 psi or more. If it's 100 psi or less there's likely and engine problem (bad valve, bad piston, failed piston rings) which will need the engine taken apart to find.
Probably the most common problems are a dead battery or carburetor problems due to bad adjustment or build up of gummy deposits. Carburetor problems usually come on slowly though. If a scooter is OK one day and refuses to start the next day, I'd first suspect an electrical problem.
Subscribe to:
Posts (Atom)