Sunday, August 14, 2011

Add a 12v socket to any scooter

There are lots of uses for a 12v power outlet on your scooter. For example:
  • Charging or powering a cell phone
  • Powering a GPS unit
  • Powering a Radar detector
  • Powering an electric tire inflator
  • Powering an auxiliary light
  • Charging your scooter battery
  • Powering heated gloves
Adding a 12v power outlet isn't difficult at all. You can find one at places like eBay or Amazon.com. What you'll usually get is a 12v socket (also known as a "cigarette lighter" socket) with an attached inline fuse. If it doesn't come with a fuse, it's a good idea to add one. To mount the outlet you'll usually have to make a hole about 1" in diameter somewhere on the scooter. I've seen them installed inside the "glove box", though that would mean you'd need to open the "glove box" to get access to it. On my scooter I installed it just below the front of the seat. There's an access panel below it which allow you to get at the spark plug and valve cover, and that also allows access to the back of the power socket for easy wiring.
12v outlet on scooter
The socket can get its power from any 12v line. You can pick one that's activated by the ignition switch, or you can do what I did and connect it directly to the battery (via a fuse of course) so that you have power available at all times, not just when the ignition is turned on.
Most motorcycle batteries have a capacity in the 3-7 amp.hour range, so you can't draw a huge amount of power from them. My outlet is fused at 8 amps, which is enough for a 55W auxiliary light (which draws about 4 amps) or a tire inflater (typically 2-3 amps), heated gloves (typically 1-2 amps) and more than enough for any electronic gadget such as a radar detector or GPS unit (typically well under 1 amp). Don't try drawing huge amounts of power though. The battery is quite small and could run down quite quickly if the engine isn't running to recharge it. Even if the engine is running you could strain the alternator (generator) if you try to draw too much power.
Installation of a 12v outlet is simple. The one I added mounted in a 1" diameter hole. I cut it out with a hole saw and smoothed the edges with a file. Since you're likely to be cutting the hole in plastic, this isn't a lot of work. The negative (black) lead connects to the chassis of the scooter. The red lead connects to the fuse and the fuse connects to the positive (+) terminal of the battery. Make sure the wires are secured using nylon cable ties so that they don't get caught up in any of the scooter's moving parts and they don't rub against any hot parts of the engine which could melt the insulation on the wires and cause a short circuit.
scooter 12v auxiliary power outlet
As I mentioned above, as well as using the 12v outlet to power external equipment, you can also use it to charge the battery. On my scooter it's not easy to get direct access to the battery terminals. You have to remove the "floor mat" and then remove a door to expose the battery connections. With the 12v outlet wired directly to the battery (via an 8 amp fuse in my case), you can simply attach a 12v plug to the charger (mine came with one) and plug it into the 12v outlet. For most scooter and motorcycle batteries a charger of 2 amps or less is fine. I use my charger to keep my battery in good condition over the winter when the scooter sits in the garage for weeks at a time waiting for a day that's warm and dry enough to ride!
I also use the outlet to power a 12v tire inflator. The battery has plenty of power to inflate both the front and rear tires from 0 to 32 psi. After inflating both tires the scooter started right up, so there's no danger of running the battery down in normal use. Having the outlet available makes topping up the tires a simple job, and if it's easy to do you are more likely to do it.

wiring diagrams

a basic set of common wiring diagrams for the 150cc scooters as well as many of the 50cc gy6 scooters
Okay, so from time to time, we get queries about wiring diagrams so I thought I'd post a couple of generic diagrams I have.  Feel free to add your own diagrams!

Note: Your scooter may differ from these but they are a good guide anyway...


This pic shows the location of some of the components under the front plastic on a lot of scoots. Your scoot may differ...


proper kick start mechanics for 50cc and 150cc scooters

50cc:

The kick starter on your Chinese scooter is for emergency use only. It's not designed for every day prolonged use.

50cc:

If you want your kick starter to last for the life of your scooter then go ahead and remove the lever and re-install it at a 1:30 or 2 o'clock position so you get a little more travel when you kick it. This way you won't crack the case as easily. The case cracks when the lever is on the bottom of it's stroke and you're still kicking, or if you kick it too hard. You shouldn't have to kick with all your might to start a healthy engine. Moving the lever up a little will allow a better mechanical advantage and lessen the chance of cracking the case. 

You have to remove the bolt from the lever completely to get the lever to slide off. Tapping a flat screwdriver in the space where the bolt goes through will open the clamp and the lever will slide off with little effort.

The little half-moon shaped gear should be positioned as show in the second and third pics to get full range of motion. You can change the position by pulling the round gear out a little bit to un-mesh the gear teeth, then use the kick lever to re-position the half-moon gear and push the round gear back in to lock it in place. You'll see.   Cool

 To remove the cover you simply remove the 8 (short case) or 10 (long case) bolts around the perimeter of the cover and it will pull off. The kick lever makes a good handle to pull on but if it's the first removal, you may need to hit the case on the back with a rubber hammer to break the seal on the gasket. If the gasket tears it's okay. Just replace it torn or remove it altogether. It's really not necessary to even have a gasket on there.

When kick starting, it's best to work the kicker slowly until you feel resistance against your foot. That means the engine is on a compression stroke. At that point, let the kicker come back up to the top before you kick it. The engine is more likely to fire on a compression stroke with a full kick. If it doesn't start on the first kick then repeat the process. Don't just kick it willy-nilly.   Wink

Kick lever re-positioned.


Proper position of the kicker gears. I always put a small dab of grease in the starter clutch bushing.


Case cracked  Sad


150cc:

The kickers on the 150cc scoots are fragile as well. There are a lot of moving parts that are subjected to belt dust so keeping things clean and a little dab of grease on the shaft ends of the gears is good preventative maintenance. And like the 50's, DON'T KICK TOO HARD!  The case can/will crack rendering the kicker useless.

Clean and grease the ends of the shafts where they pivot only! Some grease where the kicker shaft passes through the belt cover is okay but just a little. You do not want grease to migrate to the belt and pulleys. Wink

You can remove the lever and reinstall it so it's a little higher up on some scooters so you get a little more travel. On some scoots the body plastic prevents you from doing that.

Dirty gears... YUKK!


Proper position of the gears when re-installing:


Components:


thnx to fox of scooterforumonline


Saturday, August 6, 2011

Issues with the electric start

When dealing with the electric start, and it is not wanting to crank but it will start via the kick-start the things to remember is that the electric start functions through something known as the flywheel. The flywheel is essentially copper wound up on some coils spinning on a wheel tapping against conduits that will generate a current which in turns start the scooter up. If you find that it is not starting with electric but will start with the kick start then you must pull the flywheel of and clean it as well as check the coils for looseness if they are loose in any way then that will take out the integrity of the electric start as tight coils are a must for proper connectivity, if they arent tight take a pair of pliers and tighten the coils up. also check the ignition coil for any build up on the connectors as well as if the spark plug boot is loose or gummed up. if all these are ok then the next step would be to follow up with both a valve tune up and carb cleaning to ensure proper function and fuel flow.

Sunday, July 31, 2011

gy6 4stroke engine manual

the link provided will take you to a manual fo the gy6 engine this manual includes details on how to break apart the engine piece by piece as well as guidelines for most routine maintenance procedures such as tune ups oil change brake change shock change they are included in this manual

http://k.b5z.net/i/u/6023538/f/4-Stroke_Engine_Manual_rev2.pdf

the starter torn apart

I decided to unbolt it and see whats going on inside. I took a few pics just in case anyone wanted to see for themselves.

[image]

[image]

[image]

Once I cleaned all the crap out it looked a bit better inside.
[image]

I gave the contacts a rubdown afterwards to improve contact.
[image]

Well there it is back together. Once I greased it up and mounted it back on my bike the nasty noise had gone.
[image]


credit to dogmeat of scootdawgforums

backfiring on acceleration possible cause

The last few days, my KMD 150 GY6 would start dying at intersections and give an every-now-and-then backfire.
I replaced the fuel and vacuum lines and fuel filter thinking there might be a vacuum leak because the hoses on the intake were almost ready to fall off!! :o
That didn't fix it.

Yesterday on the way home from work, it ALMOST left me stranded with the horrendous popping and backfiring.....would hardly climb hills......under load and acceleration as well as stalling at lights.
What made me think it was fuel was it would idle and rev great and part throttle was okay but once you put it under load....WOW! Fuel problem, right? EEEE! Wrong. Read on.....

So first thing this morning I tore into it thinking for sure I had ingested crud into the carburetor (blocked fuel circuit) or a tore diaphram (no part throttle enrichment) or.......
Nope.
No crud, diaphram is perfect and carburetor is spotless inside.

I beat my head against the wall for a good 4 hours this morning chasing what I thought was a fuel problem.

The problem was the two small coil wires!!
If you have these symptoms, by all means....check the two small wires at the coil!
One of mine was so loose it basically fell off in my hand!
I have NO idea how it made it over 600 miles!
It's been shorting/arcing since new, I bet.
There was black stain inside the connector boot and on the terminal from arcing/shorting.
The other terminal was a POOR fit.
I squeezed down on them with pliers to tighten their "grab", cleaned the terminals and connectors and they fit 100% better.

No kidding.....my scoot has NEVER run this good!!!.

I only hope I can save someone else the 4 hours of tinkering I went through diagnosing the problem......I beat my head against the wall chasing what I thought was a fuel problem for it to turn out to be ignition related.

Now she's running TIP TOP.

Keep scootin'!


credit to mogy6 at scootdawgforums

Friday, July 29, 2011

When you lose an eclip

Ok i dont understand exactly what you mean on mine i dont have that.fitting  i know one goes from that vacuum fitting to the carb and.the right on goes to the petcock on the left side of the scooter just under the tail frame  mayne mine is a little different i will get a picture of where the right hose leads to give you a better idea asap
« Last Edit: December 22, 2010, 12:47:33 PM by havoc983 » Logged


this is where the right hose is connected to if this helps any at all
Logged


You should get a longer tube for the carb so it's not kinked up and see what happens. I have a feeling that it might cure your issue. It can't hurt and it's cheap.
« Last Edit: December 22, 2010, 04:42:20 PM by Fox » Logged

2005 JMStar Sport 50 4T
2003 Qianjiang 50 2T
If you are in the greater Los Angeles area and need a good, reasonably priced scooter mechanic, send me an e-mail or an IM


i am not fully certain but i believe it is a vacuum leak no more than ever i did swap the hose you pointed out with a longer hose but the problem is still present i also swapped out the old fuel filter for a new one the old one was yellow and clogged i think so to be safe i swapped it out

i then test the carb by running with no air box and placed my hand on the backside of the carb

i was able to rev the scooter and felt gas against my hand as the diaphragm rising up to let the main jet work so i know the carb works i just dont know where to trace the leak as far as vacuum leaks go

i checked the air box over but saw nothing other than the hose that connects from carb to it was off

i placed it on and tried again but still no luck it dies with throttle every time except for when i put my hand to the back the carb

maybe this info will narrow the problem down for you


When i took apart my carb i saw no clip on the diaphragm needle any other suggestions i did readjust air /fuel mix on carb thru the scree on the side so any other possible ideas? I know fuel is not an issue i believe it is vacuum but where do i start vecause when i.put my hand against it it throttles just fine for a while til i remove my hand or if i leave my hand to long woth out opening the throttle all thw way it will die and not rev


 I've never seen a 150 that had no clip. Look again. Two screws and the carb cap comes off. It'll take less than 5 minutes. You can do it through the seat tub hatch on most scooters. If you find a clip, move the clip to the top notch and try it. If you find no clip then tell me what's in it's place.


Silly question, but do you have both nuts on the intake manifold, because it doesn't look like it in the 2nd pic you posted.


Silly question, but do you have both nuts on the intake manifold, because it doesn't look like it in the 2nd pic you posted.

Yes iys there pics taken while dismantling scooter use one to hold in place while taking pics

Fox will check later about click and notify u of my findings as well


found the notches you were talking about fox and saw my clip is gone is there any suitable rigging i may do to fix this or would i have to order another clip setup online? i was think i maybe able to buy something to fit onto it and that would fix it temporarily or permanently just a hope anyway

but the clip is gone i cant find it anywhere in the carb or diaphragm


AHAH! No clip!  Well now, we've finally found the problem. The needle is supposed to rise with the diaphragm when you open the throttle allowing more and more fuel into the engine through the main jet the higher it rises but with no clip then it just sits there so you get idle but no throttle. The idle is a separate jet.  You can get a tiny washer and cut one side of it and pop it on there maybe or, you can put a little glob of 5 minute epoxy on the end of the needle and then install it after it hardens. As long as the glob is bigger than the hole in the diaphragm it'll work as a temporary fix.

What city are you in? Maybe there's a shop near you that has a clip. If you can't get a clip locally, PM me your address and I'll send you a clip for nothing. I'm 99% sure I have one.

BTW: If there ever was a clip it's either been lost during the carb cleaning, it's in the exhaust pipe or it got blown out of the pipe and is lost.


pensacola i will look around here after work tomorrow and see if i can find something maybe at home depot or auto zone/parts stores and see if i can find something suitable till i order the piece if necessary


This link is to a hobby shop in Pensacola that stocks parts for RC cars that use small c-clips. They have a assortment pack for $2

http://www.hobbytown.com/Shop/hardware-screws-nuts-bolts/e-clips-c-rings-universal

2620 Creighton Rd., Suite 302, Pensacola
(850) 476-2708


just wanted to say ty fox for all the help the problem was solved by the clips from hobbytown like you said and it works better than ever now i guess since getting here i gave it a massive tuneup so it idles great revs perfect and has great acceleration and a top speed of 80mph so ty very much and merry xmas to ya


NICE!   Cool  I love it when I help fix a scooter thousands of miles away.  Cool

I think your speedometer is off or it reads kilometers per hour. There's no stock 150cc that can go over 60-65mph downhill with a tailwind and the rider leaning forward. 50-55 on flat ground sitting up is normal.

You can play with the clip positions to achieve the proper plug color. Nutty brown with a hint of Grey is ideal. Lower the clip to darken the plug (More fuel) Raise it to lighten the plug.

Merry Holidays! and Happy New Year!  Smiley


 this was one issue that i had and a guy off of scooterforumonline.com walked me through the issue
i had lost my eclip on the carb needle the scooter would start and idle but not function properly when giving throttle as the eclip controls the rise and fall of the needle in the carbs diaphragm

Reason to change from the stock filter on a scooter

Hi gang. Just a tip for you dawgs out there. These photos show you why it is so important to change out the stock fuel filter that comes on your new scooter. They are of dubious quality and may even be included in a recent recall of chinese fuel filters. I recently changed mine as it was leaking at the glued seam. I was more concerned with the crappy design of it. I opened it after noticing that the paper filter inside looked strange. What I found was that the paper element was not sealed all the way around. That is as good as no filter. Th fuel line was thin and very stiff like plastic. I replaced it with some quality rubber fuel line. I suggest you change yours too.

[image]

[image]

[image]

[image]

[image]

ty magnaman of scootdawg forums

Engine Backfire on deacceleration

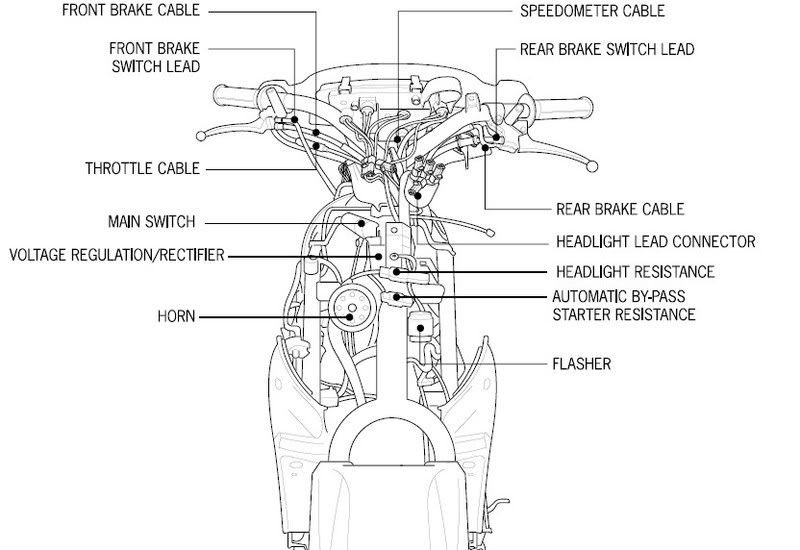
One of the most asked questions pertaing to the Honda Elite CH
 150/250 and CN 250 Helix involves a backfire through the
 exhaust on sudden deceleration.

 An engine is not supposed to backfire and, when it is persistent,
 It could be harmful to the engine. If there is an explosion in the
 exhaust pipe when the cylinder is trying to exhaust its spent
 combustion products, a back pressure is created which
 interferes with the next cycle. This could result in incomplete
 extraction, irregular charging with the fresh mixture, and
 overheating. In addition, valves are not designed to seal against
 pressure from their backsides and a broken valve rattling around
 in the combustion chamber is a real possibility. While the
 explosion sound ranges from a baby fart to a gunshot, its
 annoying to say the least. In almost all the situations studied
 various causes and remedies have been found with none
 answering the question entirely.

 In general, backfiring on deceleration (as opposed to
 acceleration) is generally caused by a lean condition in the pilot
 circuit. What happens is that the mixture leans out enough to
 where is fails to ignite consistently. This, in turn allows some
 unburned fuel to get into the exhaust pipes. Then when the
 engine does fire, these unburned gasses are ignited in the
 exhaust pipe, causing the backfire. Then, the classic diagnosis
 is too lean a fuel mixture. The real mystery is where that lean
 condition is coming from.

 Here are the suspects:

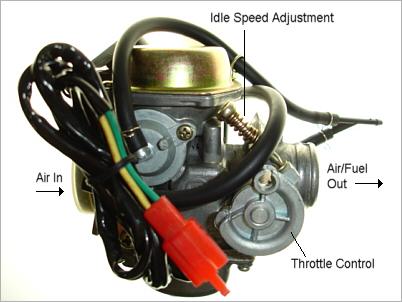
 1. Low Idle. Some folks cure backfiring by turning up the idle
 slightly. This is the screw with the spring on it in the right front of
 the CV carburetor. Recommended rpm is between 1100-1500.
 Many scooters never run at the low end of the recommended idle
 rpm range anyway. Turn up the idle first.

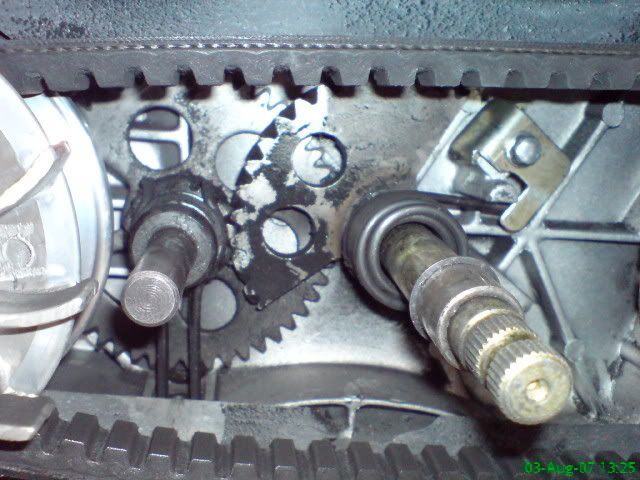
 2. Exhaust Gasket. This seems to be one of the most frequent
 causes of backfiring problems and an item that has been seen
 to fail quite often. Air is sucked back into the combustion
 chamber causing a lean condition at ignition and the backfire.
 The exhaust gasket is a small metal rimmed fiber edged part
 that people seem to forget to inspect when servicing the exhaust
 or leave it out altogether.

 3. Leaking Carburetor Intake Boot. The CV carburetor is fastened
 to the intake with a stiff rubber intake boot. Sometimes it is not
 sealed properly or gets a small crack in it enough to allow
 excess air into the intake. The extra air from the split boot will
 cause the popping. To check your intake rubber, you can spray
 WD-40 in the suspected area while the engine is running. Any
 decrease in engine revs confirms a leak. Another method is to
 use an unlit propane torch, just barely cracked open, and see if
 the idle changes when the gas gets sucked in. Don't get carried
 away or you will flame the scoot! Less messy than using WD-40.

 4. Leaking Vacuum Hose. Any misconnected or leaking carb
 vacuum hoses can also encourage backfiring. That means the
 carb fuel mixture is also slightly leaner, more prone to backfiring.
 Check for cracked or stiff bending hoses and replace if
 necessary. Putting the hoses back correctly may help with the
 backfiring without having to adjust the idle screw or pilot screw.
 The misconnected hoses can also degrade low end response
 slightly.

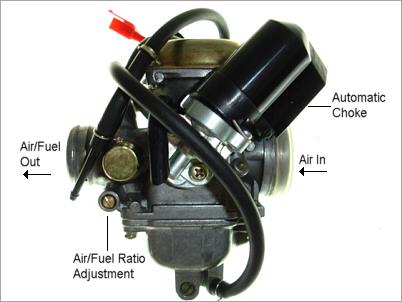
 5. Pilot Screw. On the back of the Keihin Constant Velocity (CV)
 carburetor is the pilot adjustment screw also known as the
 enrichment circuit adjuster. On the CH 150, it is covered with a
 plug which has to be removed. On the 250 cc motors, this screw
 should have a limiter cap on it to vary the adjustment. For a rich
 carburetor adjustment, turn the adjustment screw clockwise (in
 toward the carb body) a tad to eliminate a lean running condition.
 All adjustments should be made with a warm engine. See Tech
 Tip #7 Pilot Screw Adjustment & Fix for a more detailed service).

 6. Air Cut-off Valve. This component is the prime suspect. On the
 back of the CV carb is the air cut-off valve. The air cut off valve
 enrichens the pilot circuit on deceleration by means of a
 rubberized piston. One hose to the valve (nearest air filter) is the
 air tube connector and the other (nearest the autobystarter) is the
 vacuum connector port. If air pushed through the cut-off valve by
 a pressure pump leaks by the vacuum port connector while
 vacuum is initiated with a vacuum pump, replace the air valve. I
 replaced a faulty air cut off piston and my backfiring ceased. The
 air cut-off valve is expensive (about $70) and should be replaced
 after all other suspects tested have failed.

 7. Enrichening The CV Jetting. I solved a similar deceleration
 backfire on a CH250 by removing the 112 (lean) main jet and
 using a 115 or 118. The CN250, which uses a leaner 110 main
 jet, could also benefit from the main jet enrichment.

credit to jwp767 and randy pozzi

the info is a valid solution for many makes and models.

Changing a camshaft on a scooter motor

Camshaft Install Instructions

A. Before installation
1) Wash the entire buggy. This will keep dirt from falling where you don�t want it while the engine is exposed.
2) Remove the passenger seat from vehicle.
3) Make sure the engine is cold.

B. Access Camshaft assembly
1) Loosen the intake tube at the carburetor and remove the airbox and tube assembly.
2) Remove black plastic fan shroud from passenger side of motor. (Seven 8mm screws/bolts)
3) Remove carburetor and air intake boot from motor as a unit and place on a clean surface. Force may need to be applied to remove intake boot from engine if it binds. (Two 10mm nuts)
Note: Fuel line will need to be clamped to avoid dumping fuel.
Note: Insert a small clean rag into the intake hole to keep dirt from falling into the engine.
4) Remove plastic shroud from top of motor to gain access to cam chain tensioner. The lower shroud does not need to be removed.
Finding Top Dead Center
What is TDC? Top Dead Center refers to the piston being at the very top of its travel in the cylinder. On a four stroke, TDC will occur at the top of the compression stroke and the top of the exhaust stroke.
5) Remove sparkplug.
6) Move Flywheel until (T) mark is aligned with the arrow mark on the engine case.
7) Loosen four valve cover bolts and remove the valve cover.
8) Now that you are inside the valve cover, rotate the flywheel until the cam is at the TDC position with hash marks aligned straight across the valve cover surface and the large TDC hole at the top of the cam gear. (Large TDC hole should be pointing directly towards seats)
Note: Document TDC on the flywheel using permanent ink; reference your mark to a point on the engine case.

C. Remove Camshaft
1) Remove the cam chain tensioner by removing the 2 bolts that secure it to the cylinder. Unless you have a spare, you will need to reuse the gasket. Use a razor blade to properly separate the gasket from the tensioner.
2) Remove the 4 head bolt nuts from the rocker tower and remove it.
3) Remove cam chain by tipping the cam gear downwards.
Caution: Be sure not to drop the cam chain down into the case. The case may need to be split to refit it.
4) Secure the cam chain with a cord or rope tied to a part of the chassis so it can be accessed on reassembly.

D. Reassembly
1. Insert the new cam by again tipping the cam gear down and attaching the cam chain making sure the alignment is set to the mark you made on the flywheel and the hash marks on the cam, with the large cam hole pointing at the seats.
2. Install the cam tower back onto the cylinder studs with the EX towards the exhaust valve (downward).
3. Install the head stud nuts and torque to 1st 16 lbs then on to 25 lbs using a cross pattern.
Note: The Yerf Dog manual states 16lbs on these nuts, however they come from the factory tourqed to 25lbs.
4. Recheck the cam alignment chain to ensure the cam is in the correct position to the mark you made on the flywheel.
Cam Chain Tensioner.
5. Release the spring tension on the cam chain adjuster by removing the screw cap and turning the adjuster inside using a small flat blade screwdriver clockwise until it stops. This will remove all tension from the adjuster.
6. Insert the adjuster and tighten the 2 mount screws while holding the 0 tension on the adjuster.(Make sure gasket is in place.)
7. Turn the adjuster back to full tension (rotate counter-clockwise, will rotate on its own) and reinstall the cap screw.
Caution: Failure to release the tension on the Cam Chain Adjuster during reassembly will damage the cam chain beyond use. (The cases must be split to replace the cam chain.)
Adjusting the Valves.
1. Adjust the valve tappets using a feeler gauge to a clearance of :
Intake- .002- .004 � Exhaust .003-.006�
Note: Printer paper happens to be 0.003� :)
Note: Valves must be adjusted on a COLD engine.
Note: Adjust valves with engine at at TDC.
2.Loosen the 9mm valve tappet lock nut and turn the tappet out several turns
3.Sandwich your feeler gauge between the bottom of the tappet (adjuster screw) and the top of the valve
Note: Feeler gauges are thin pieces of metal which are a predetermined thickness.
4.Tighten the tappet while moving the feeler gauge back and forth until you can feel a slight drag on the feeler.
5.Tighten the lock nut with the feeler in place.
6.Ensure the gap is still within proper range by sliding the feeler back and forth again.
7.Repeat step 2 - 6 for remaining valve.

E. Final Assembly and Inspection.
1. Rotate the assy several times by turning the flywheel then recheck the TDC-Mark to Cam alignment.
2. Reinstall all remaining assemblies in the reverse direction of disassembly.
3. Check operation of motor. ( Does it start and idle?)
4. Check jetting and set as required by intake, exhaust and cam use.

Proper selection of carb jets

Sizing at sea level:
With UNI filter 120-125
With UNI filter and low restriction exhaust 130-135
With UNI filter, low restriction exhaust, A12 cam, performance coil & CDI and NGK Iridium spark plug 135-140

Test procedure:
1. Run engine at less than half throttle a minimum of 15 minutes to close electric choke
2. On a 300' or 100 meter stretch or greater, run the engine at wide open throttle
3. While still holding the gas pedal to the floor, cut the ignition
4. Remove the spark plug and inspect end for color
a. White - Increase jet size
b. Tan/Brown - Correct jet size
c. Black - Decrease jet size
5. Clean spark plug with brass wire brush and check the gap prior to next test run

Hints:
1. Change jet size by 2 or 2.5 for fine adjustment by 5 for coarse adjustment
2. Reduce jet size by 2 or 2.5 for every 1500 ft or 500 meters of elevation
3. Stock fuel delivery may not be sufficient above a 130 main jet and may require larger diameter fuel lines and less restrictive fuel filter
4. Once main jet is selected, the air/fuel mixture screw can be adjusted for optimum idle


credit to buggydepot.com

Explanation of how choke works on scoots and testing them

We frequently receive questions about how the auto-choke and its operating needle work. As it turns out, the auto-choke isn't a choke at all. That is, it doesn't choke airflow through the carburetor like you would find on a lawnmower or generator type of engine. Instead, it sends extra fuel through the carburetor. This is called an enrichment circuit.

This circuit is controlled by the charging system. When your engine is off, the choke (enrichment circuit) is actually "on" in it's default resting state. When the engine is turned on and voltage is applied to the choke, the needle extends and eventually plugs the enrichment ports within the carburetor. This happens within a couple of minutes as the engine warms up.

What we usually see with a bad auto-choke is that the engine will start up and run great cold, but as the engine warms up there will be problems driving, starting, and/or idling.

To test your auto-choke:
1. Remove choke assembly from the choke holder on the side of the carb. The needle should be clearly visable.
2. Measure the overall length of the choke from end-to-end, including the very tip of the needle.
3. Now connect the choke's electrical leads to a 12v power source. Black is negative.
4. Wait 5-10 minutes and re-measure. The needle should have extended.
5. The overall length should be approximately 3mm more than before.


credit to buggydepot.com

loss of power common problems and solutions

Bogging down is usually caused by one (or more) of three things. Running rich, running lean, or a weak spark.

I'll start off with a very brief explanation of what Air/Fuel mixture is. The job of a carburettor is to atomize liquid fuel by injecting it into a flowing stream of air. The mixture of this air and fuel must be rather precise in order to combust within the cylinder. If there is much air, or too much fuel being delivered you will experience power loss and/or bogging down. With that said.. lets get down to the troubleshooting:

Most common cause: Running rich
Running rich (too much fuel in the air/fuel mix) could be caused by several things. The most common cause is a failing automatic choke unit. The choke on the GX150 carburettor is actually an enrichening circuit and in reality does not choke off any airflow at all. The auto-choke is ON in it's natural state. A failing auto-choke remains in the ON position at all times, thus it is characterized by the buggy running fine when cold, and hardly running at all when warm.

Running Lean
You may be running lean (too much air in the A/F mixture) if you are: 1. Having a hard time getting the engine started, 2. Once started the throttle is very tricky, too much throttle and the engine dies, and/or 3. Engine bogs and will not go beyond a certain RPM. This is commonly caused by a deteriorated intake inlet manifold. This inlet manifold can be found connecting the carburettor to the intake side of the engine. This little elbow-shaped inlet can form dry-rotting cracks, thus becoming a major vacuum leak. Please note: when replacing the intake inlet manifold, do NOT over tighten the nuts when securing it to the cylinder head.

Weak Spark
If the Air/Fuel mixture getting to your engine seems fine, then you may be looking at a weak spark. Ignition troubleshooting will be covered in detail on another page. The basic rundown is this: Stator/trigger wire -> CDI -> Ignition Coil -> Spark plug. It is best to check the resistance of the parts in question. Check the Yerf Dog GX150 Service Manual to find out the correct resistance values.

credit to buggydepot.com for info

Wednesday, July 27, 2011

how to read ngk plugs

Q: How do I "read" a spark plug?
A: Being able to "read" a spark plug can be a valuable tuning aid. By examining the insulator firing nose color, an experienced engine tuner can determine a great deal about the engine's overall operating condition.
In general, a light tan/gray color tells you that the spark plug is operating at optimum temperature and that the engine is in good condition. Dark coloring, such as heavy black wet or dry deposits can indicate an overly-rich condition, too cold a heat range spark plug, a possible vacuum leak, low compression, overly retarded timing or too large a plug gap.
If the deposits are wet, it can be an indication of a breached head gasket, poor oil control from ring or valvetrain problems or an extremely rich condition - depending on the nature of the liquid present at the firing tip.
Signs of fouling or excessive heat must be traced quickly to prevent further deterioration of performance and possible engine damage.
Normal Condition
Normal Condition
An engine's condition can be judged by the appearance of the spark plug's firing end. If the firing end of a spark plug is brown or light gray, the condition can be judged to be good and the spark plug is functioning optimally.
Dry and Wet Fouling
Dry and Wet Fouling
Although there are many different cases, if the insulation resistance between the center electrode and the shell is over 10 ohms, the engine can be started normally. If the insulation resistance drops to 0 ohms, the firing end is fouled by either wet or dry carbon.
Overheating
Overheating
When a spark plug overheats, deposits that have accumulated on the insulator tip melt and give the insulator tip a glazed or glossy appearance.
Deposits
Deposits
The accumulation of deposits on the firing end is influenced by oil leakage, fuel quality and the engine's operating duration.
Lead Fouling
Lead Fouling
Lead fouling usually appears as yellowish brown deposits on the insulator nose. This can not be detected by a resitsance tester at room temperature. Lead compounds combine at different temperatures. Those formed at 370-470°C (700-790°F) having the greatest influence on lead resistance.
Breakage
Breakage
Breakage is usually caused by thermal expansion and thermal shock due to sudden heating or cooling.
Normal Life
Normal Life
A worn spark plug not only wastes fuel but also strains the whole ignition system because the expanded gap (due to erosion) requires higher voltages. Normal rates of gap growth are as follows:
Four Stroke Engines: 0.01~0.02 mm/1,000 km (0.00063~0.000126 inches/1,000 miles)
Two Stroke Engines: 0.02~0.04 mm/1,000 km (0.000126~0.00252 inches/1,000 miles)
Abnormal Erosion
Abnormal Erosion
Abnormal electrode erosion is caused by the effects of corrosion, oxidation and reaction with lead - all resulting in abnormal gap growth.
Melting
Melting
Melting is caused by overheating. Mostly, the electrode surface is rather lustrous and uneven. The melting point of nickel alloy is 1,200~1,300°C (2,200~2,400°F).
Erosion, Corrosion & Oxidation
Erosion, Corrosion and Oxidation
The material of the electrodes has oxidized, and when the oxidation is heavy it will be green on the surface. The surface of the electrodes are also fretted and rough.
Lead Erosion
Lead Erosion
Lead erosion is caused by lead compounds in the gasoline which react chemically with the material of the electrodes (nickel alloy) as high temperatures; crystal of nickel alloy fall off because of the lead compounds permeating and seperating the grain boundary of the nickel alloy. Typical lead erosion causes the surface of the ground electrode to become thinner, and the tip of the electrode looks as if it has been chipped.
 
 
straight for the ngk website

adjusting the carb

If there's any one component that's more likely to go out of adjustment on your scooter (especially perhaps your Chinese scooter!), it's the carburetor. If it does go out of adjustment lots of things can happen. It can make the scooter hard to start, it can make the scooter slow to accelerate, it can cause the scooter to idle badly and stall or it can make the scooter idle fast so that it's trying to go all the time and needs the brake to hold it stationary. None of these things are good.
What the carburetor does is regulate the amount of fuel and air which are supplied to the engine. To go faster you need more fuel and more air and they must be in the right proportion. The fuel also has to be atomized as much as possible (i.e. be supplied in tiny droplets). The carburetor controls all these functions and generally does it quite well.
The type of carburetor used on most 150cc GY6 type engines is a Keihin style CV carburetor with a 24mm throat. Keihin design carburetors are a well tried and tested design developed in Japan (Keihin is a region near Tokyo).
Without removing and disassembling the carburetor, there are only two adjustments you can make, but these should take care of most minor problems. The first is the adjustment of the idle speed.
Scooter Carburetor Adjustment - Idle Speed
Above is a picture of a typical GY6 engine carburetor and the view is that from the right side of most engine configurations on 150cc Chinese scooters. There's a small spring loaded screw which adjusts the idle speed. It's right next to the throttle control which is connected to the twist grip on the right handlebar. On most 150cc scooters, idle speed should be around 1500rpm when the engine is fully warmed up. Don't make adjustments when the engine is cold. Take a 5 or 10 minute ride first. When the engine is cold the automatic choke is in operation and that can change the idle speed. If you have a tachometer, setting the speed is easy. If you don't, you want to set the speed to a low idle. Fast enough so that the engine doesn't stumble or stall, but slow enough that the clutch doesn't engage and try to move the scooter forward. On most scooters from 50cc to 250cc, this will be somewhere in the 1500-2000rpm region.
The other adjustment you can make is to the low speed fuel/air ("mixture") ratio. This is done on most scooters using a screw adjustment on the other side of the carburetor as shown below.
Scooter Carburetor Adjustment - Fuel/air Ratio
This screw changes the air to fuel ratio at low speeds. It shouldn't need much adjustment, but the way to do it is to turn the screw very slightly (1/8th turn) and see if the idle speed goes up or down. If it goes down, turn the screw back 1/8th turn to where it started, then 1/8 turn in the other direction and see if the idle speed goes up or down. If it goes down, turn it back to where you started since you didn't need any adjustment! If the idle speed goes up, continue turning the screw in 1/8th turn steps until the idle speed is at a maximum. If it starts to go down, turn it back to get the maximum idle speed.
You may need to go back to the idle speed screw to lower the idle speed if it's now too fast. So the basic procedure is to set the fuel/air mixture to give you the fastest idle, then use the idle speed adjustment to set the speed to the lowest rpm that gives you smooth running.
If the scooter idles well and runs fine at low speed, but has problems at high speed, the problem may lie inside the carburetor with the main jet. The fuel/air ratio at higher speeds is set by the jets inside the carburetor and to get at them the carburetor has be be removed and disassembled. This can be a tricky job as the parts are small and delicate. The good news is that these carburetors are quite cheap. You can get a new one for $50-$60, so if you can't make your scooter run smoothly and you don't like the idea of taking the carburetor apart, you can always replace it!

a little fun info on ocatne rating

The swami has been hearing a lot of nonsense around the gas pumps these days.  People are tanking up with the "good" stuff because the commercials imply that it's better for their engine. When the oil companies use superlatives like "Super", "Extra"  and "High"...well it must be better, right?  And of course they wouldn't be charging $0.10 - $0.20 more unless they were putting some really good stuff in there, right?  Sorry...NOT!
"High Octane" is not synonymous with "good" or "better", and does not mean that it is better for your engine!  And the chances are pretty good you don’t need high octane fuel in your scooter.
High-octane fuels only become necessary when your engine has a high compression ratio. It’s a very long and complicated story…that the swami will make short.
First important fact that you must accept:
All gasoline, regardless of its’ octane rating, have pretty much the same amount of energy per gallon. What!!! "Sacrilege" you say? Well, actually, some higher-octane fuels have a few LESS percent energy per gallon…so as not to argue over this small point, for the sake of this discussion we will all agree that the automotive gasoline that you buy at the pump, regardless of octane rating, has the same amount of potential energy.
Second important fact that you must accept:
Octane is NOT a measure of power but of the fuels’ resistance to ignition from heat. A higher-octane fuel, under identical combustion chamber conditions, will burn slower.
How can this be? If all of the above is true, how do we get more power out of high octane gasoline? We do, don’t we?
Well…yes we do. Here’s how:
But first you must understand "heat of compression". There is a 2,000 year old fire starting device that still amazes the swami. A length of bamboo was hollowed out leaving one end capped. A stick, about the same length as the bamboo, was whittled down until it fit snugly into the bamboo cylinder. A bit of dried grass or wood shavings were placed in the bottom of the bamboo cylinder and the snugly fitting stick was violently rammed down the bamboo tube. The heat generated from rapidly compressing the air in the tube was sufficient to ignite the tinder.
The same thing can happen in the cylinder of an engine. The piston, quickly squeezing the fuel/air mixture into a small space, can generate enough heat of compression to ignite the fuel well before the spark plug fires, with unpleasant results. If the fuel prematurely ignites while the piston is on its way up, the burning of the fuel, in conjunction with the rising piston, creates even more pressure, resulting in a violent explosion. This explosion is equivalent to hitting the top of the piston with a very large hammer. If you want to be able to see through the top of your piston, ignore those sounds that are usually called: "pre-ignition", "ping" or "engine knock". Trust me on this one; in his reckless youth, using this method, the swami turned a few pistons into paper weights.
What we really want is a very rapid burn of the fuel, not an explosion. And we want the burning of the fuel to take place while the piston is in a better position to convert this pressure into productive work, like on its way down. Think of this burning as a very fast "push" on the top of the piston. Despite the violent noises you hear from some exhaust systems, it really is a rapid push on the top of the piston making the crankshaft go around, not explosions.
So that we can ignite the fuel at exactly the right time with the spark plug, instead of from the heat of compression, they put stuff into gasoline to keep it from igniting prematurely. The more resistant the fuel is to ignition from the heat of compression, the higher its octane rating.
Are you with me so far?
Higher compression ratios = higher combustion chamber pressures = higher heat… and it is with these higher combustion chamber temperatures that the magic happens.
At higher temperatures the fuel is burned more efficiently.  So, while it’s true that the higher-octane fuel does not posses any more energy than low octane fuel, the increased octane allows the extraction of more of the potential energy that has always been there. Conversely, lower compression ration engines utilize a little less of the fuel energy potential (2-4% reduction) but there is also less heat generated in the combustion process.
So how do you know if you need high-octane fuel? The swami suggests you look in the owners’ manual! Manufacturers really do want you to get the maximum efficiency out of your engine. They do their best to give a good balance between horsepower and engine life. It’s in their best interests to do so.
There is ABSOLUTELY NO BENEFIT to using a higher octane than your engine needs. The only benefit is increased profits to the oil companies that have cleverly convinced some of the public that their new "Super-Duper, Premium-High-Test, Clean-Burning, Used-By-Famous-Racing-Types-All-Around-The-World, Extra-Detergent-Laden-Keep-Your-Pipes-Clean, Extra-High-Octane" fuel is your engines’ best friend. The swami is telling you the truth, don’t listen to that talking cartoon car.
The swami hears people insisting that they got better mileage, better acceleration, and less dental plaque by switching to a high-octane fuel. The swami reminds these people that in every pharmacy is a special miracle pill that is often prescribed by doctors, it works wonders because people believe that it works wonders; it’s called a "placebo". The swami warns: never confuse faith with physics!
If you are getting pinging or knocking with what should be the correct octane for your engine, start by checking the ignition timing, also check that the spark plug is the correct heat range. For 2-strokes, check for excessive carbon build-up on the top of the piston, the carbon takes up space and increases the compression ratio.
If all is well and correct, and you still are getting knocking, then try the next higher octane. You won’t go faster, you won’t go farther, but you will prevent an unsightly hole in your piston.
This subject is a whole lot more complicated than the swami wants to bother with. If you are curious to know more, put some of these words into your search engine and enjoy the education:
Antiknock Index
Octane
Stoichiometric Combustion
Thermal Efficiency
Flame Front
Highest Useful Compression Ratio
Compression Ratio
Placebo

replacing lost exhaust head nuts

If you lose one of these cap nuts that hold on the exhaust header, you'll have trouble finding one locally. Online they can be very expensive.....as much as $12 ea.

Here's a cheap replacement.....they're called "extenders", available in various thread sizes at Ace Hardware $1.69ea. This one happens to be 8mm. The reason a long nut is better than a normal nut....easier to install in an awkward area. The OEM cap nut is on the left....

[image]

I never have liked cap nuts in any application. They look neat and hide the threads of the stud/bolt, but they trap moisture and can rust solid. And since the end is closed, you can't spray any rust-buster on the threads.

So I switched over to a set of these extenders. And I drilled a set of holes near one end.....

[image]

The holes.....used for a safety-wire. When wired together after the installation, they won't fall off. Pretty neat. I coat the threads with adhesive silicone to prevent loosening, and spray some lube into the openings from time to time.....works well. ;)

[image]